In this tutorial, we’ll build a signup UI using React/Redux and three of my favorite libraries: Ramda, Recompose, and Redux-Observable. Going in that order:
Ramda
A JavaScript functional programming utility belt. Its > 200 functions help enforce a purely FP style. I’ve truly grasped concepts like higher-order functions, currying, and point-free programming through this library.
We’ll sparingly use it, so I have multiple articles on it if you’re further interested. Official docs here.
Recompose
Ramda–but for React components. If you want React, using only functions + several useful helpers, this library’s for you. Our container (Redux-connected) component will just be pure functions, with the help of Recompose. Official API docs here.
Redux-Observable
If your app’s entirely pure functions, how do you perform useful side effects like HTTP calls and UI changes? You need some “process manager” listening to your actions, waiting to perform a side effect and fire another action in response. These are called Epics. We’ll use Redux-Observable and cover the details later. Official docs here.
This requires some RxJS knowledge, but fear not if you’re unfamiliar with it–we’ll go step by step. Official RxJS docs here.
Bonus: Autodux
I don’t mean to complicate this tutorial, but I’m using Eric Elliott’s Autodux library to create our actions/reducer. It’s completely optional, but I love it for reducing so much Redux boilerplate. Official docs here.
Setup
Find and clone a React/Redux starter kit. I’ll be using my React/Redux starter with its peculiar file structure.
You may also clone this tutorial’s GitHub repo and code on the master branch. If you’d like to reference the final code, do git checkout done and see the done branch.
Either way, make sure you have the aforementioned libraries
npm i redux-observable rxjs recompose ramda -S
Optionally install autodux
npm i autodux -S
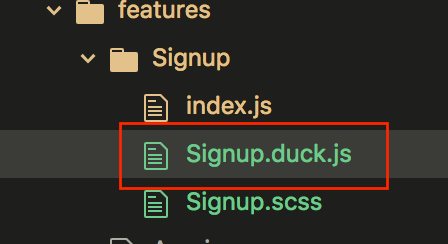
Signup/index.js
Once your React/Redux setup’s complete, create a Signup folder and add an index.js file in it. I’m putting in src/features, but it doesn’t matter in the end.
We’ll add and export our initial JSX.
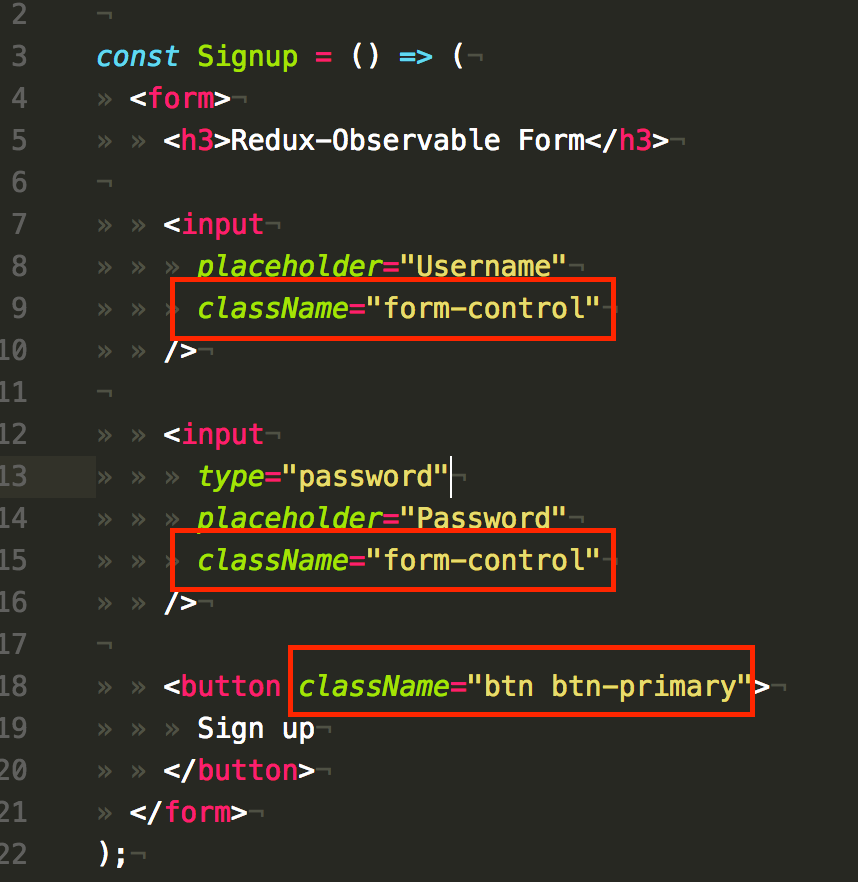
We need a form, two inputs, and a button.
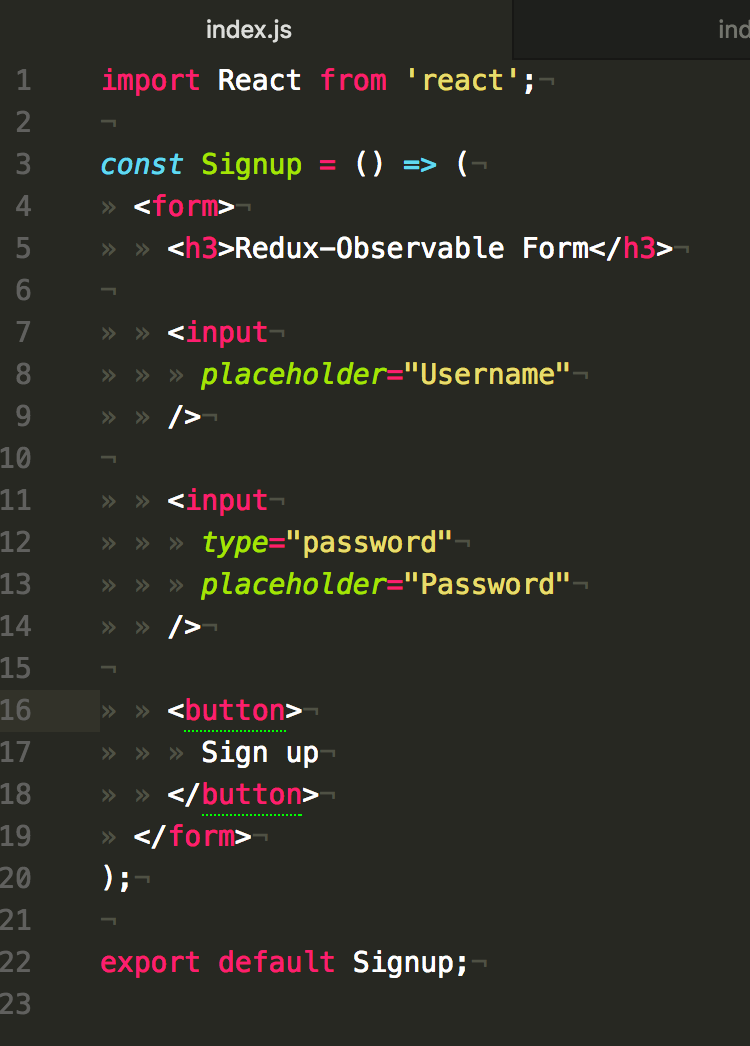
Our resulting UI’s pretty gruesome.
I normally wouldn’t care for a proof-of-concept app such as this, but I can’t be unprofessional here. 😏
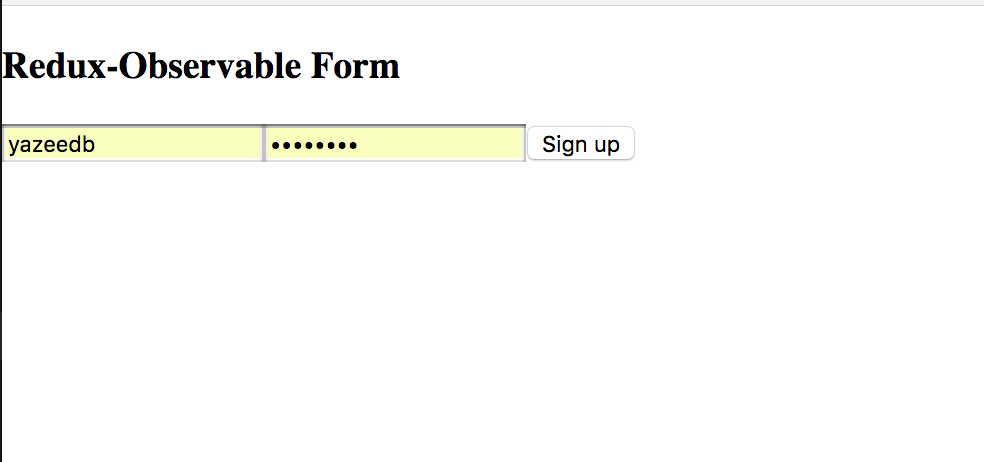
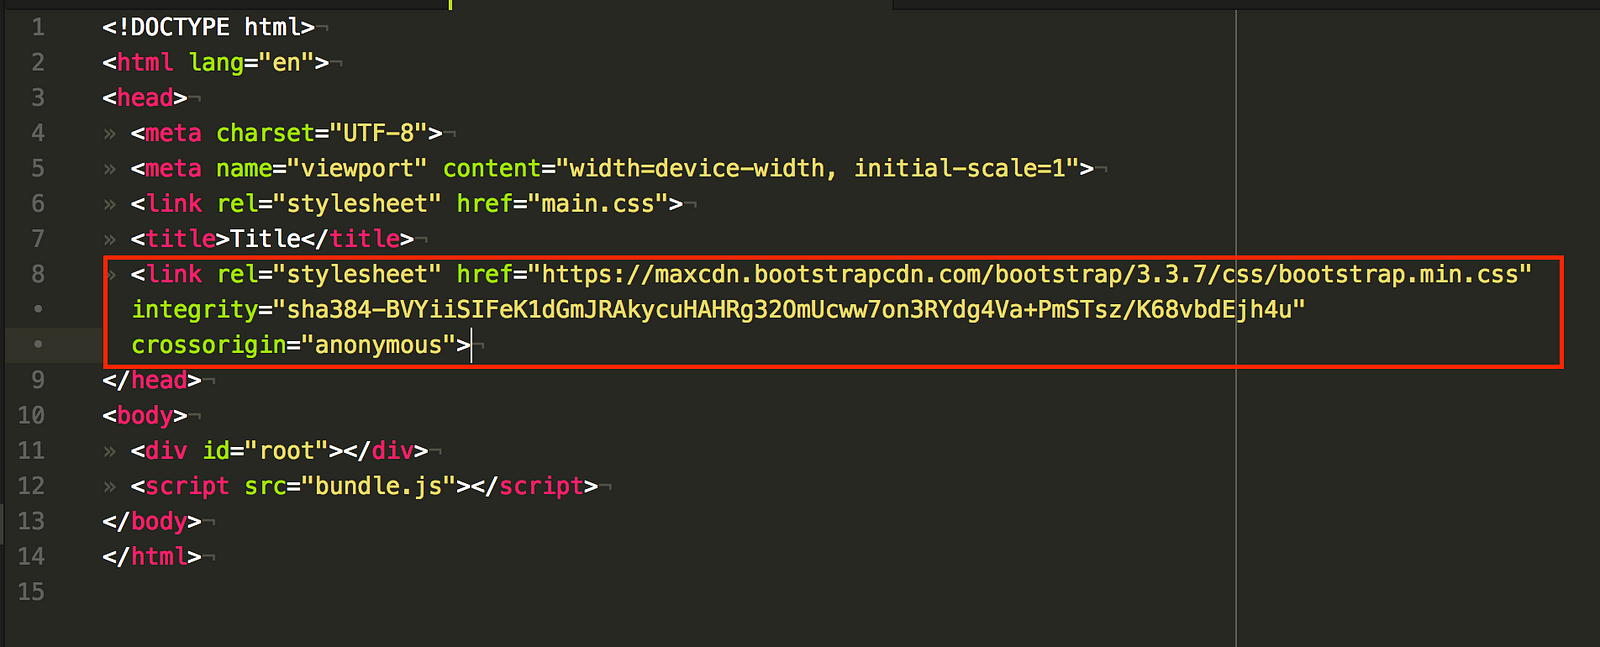
If you like, include Bootstrap’s CSS via CDN in your index.html. If not, feel free to skip the styling part.
And add the .form-control class to your inputs, and btn btn-primary to your button.
Our UI’s cleaner, but…large.

Again, if you like, add/import the following styles
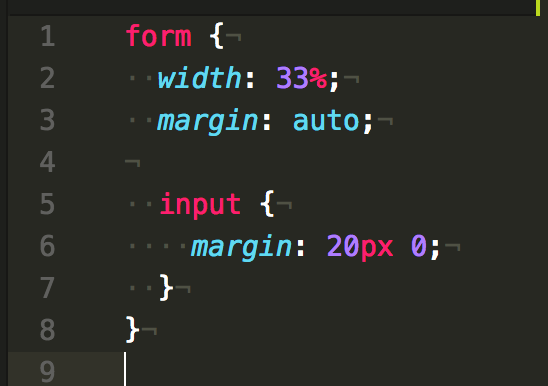
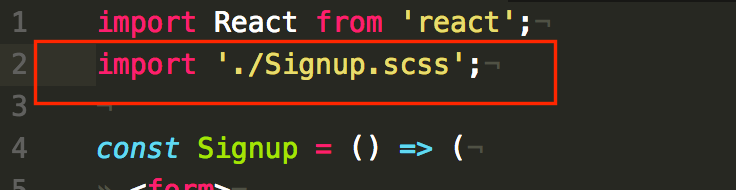
I’m putting these in Signup.scss and importing it.
Much better!

Signup/Signup.duck.js
Let’s think about our state next. We wish to manage:
- Username
- Password
- Loading indicator
- Success indicator
- Signup response body (new user’s
id)
Our initial state might look like this
initial: {
    username: '',
    password: '',
    loading: false,
    success: false,
    id: null
}
And we’d want the following actions to update that state
setUsernamesetPasswordsendSignupInfosignupSuccess
I’ll use autodux because it makes the setup trivial. First the file:
Now import autodux and give it our slice and initial state.
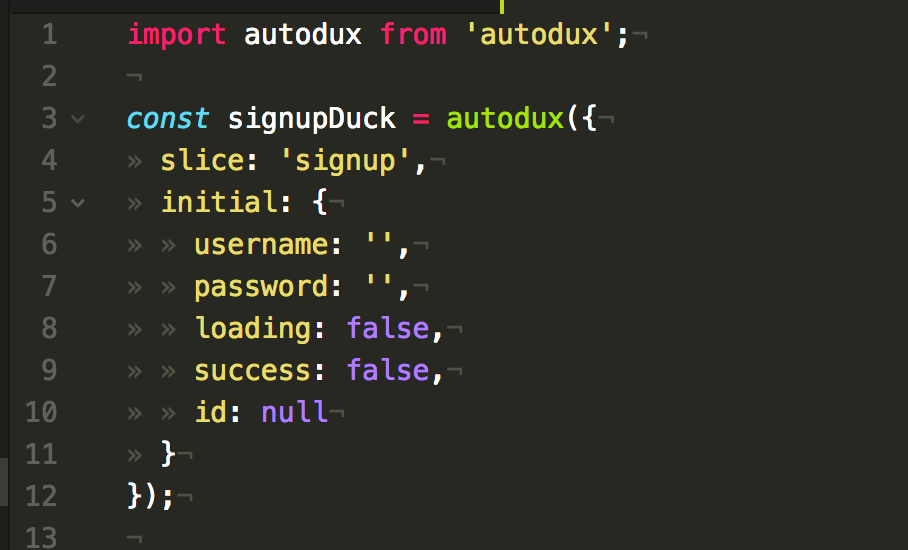
slice prepends your auto-generated action types, helping guarantee their uniqueness. It’s not that different from the createReducer I’ve previously mentioned.
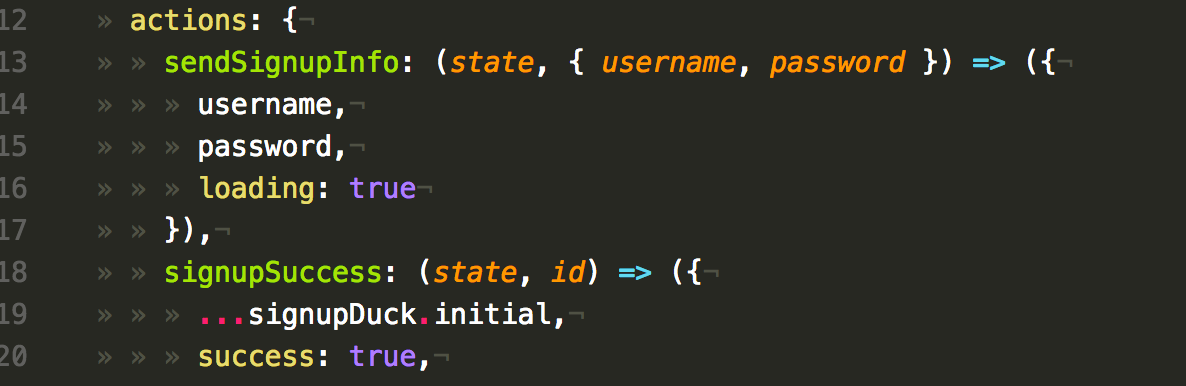
initial is our initial state. Now let’s add the actions.
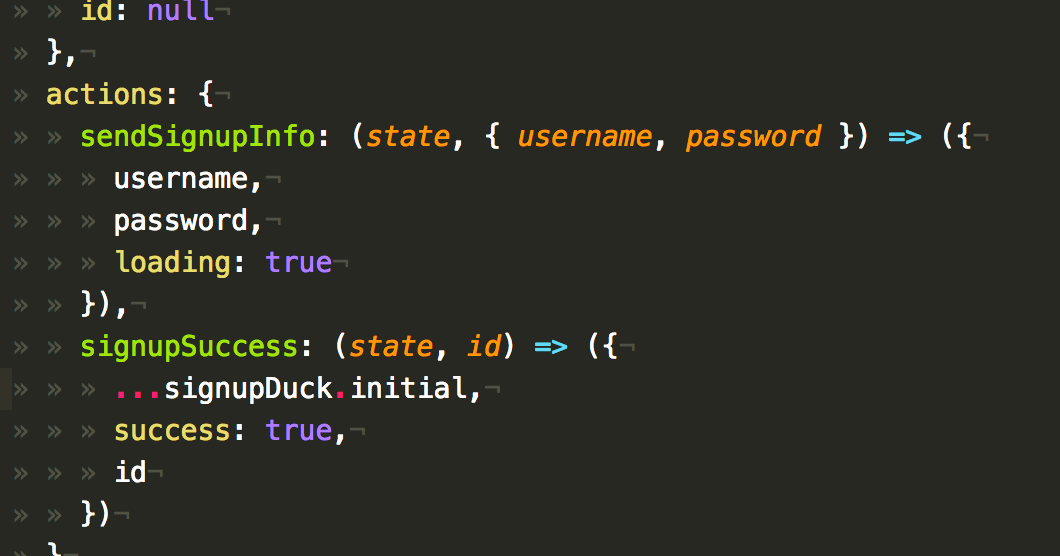
I’m only defining these two actions. Autodux automatically creates common getters/setters for your state pieces.
Just by providing a username and password in the initial state, I got setUsername and setPassword actions for free!
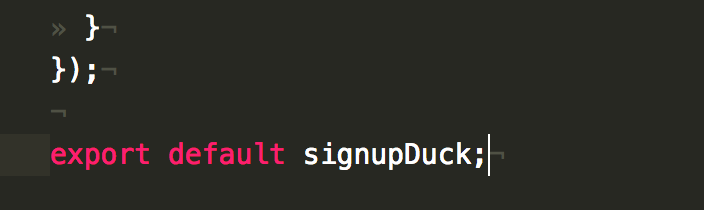
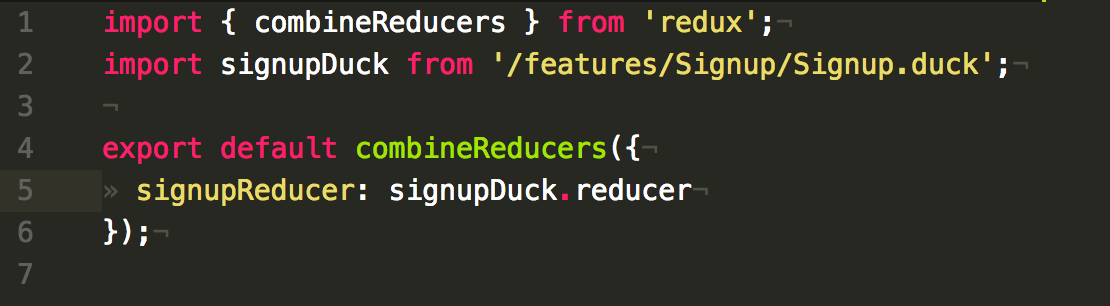
Export signupDuck, then import and console.log it in your root reducer.

Here’s our result

Pretty cool stuff. Moving on.
Add our new reducer to the root.
connect() time
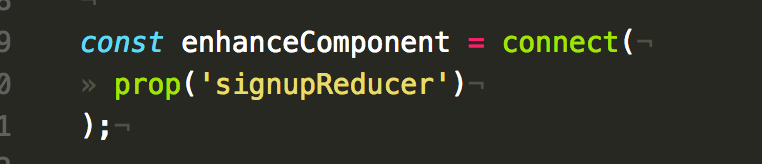
Now that we have some state, let’s connect to it! Grab the connect higher-order component from react-redux and decorate Signup with it.
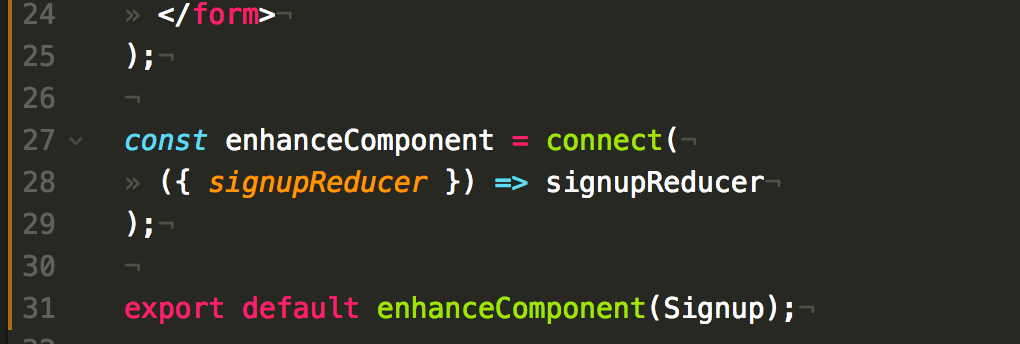
As promised, we’re using Ramda. So we can grab signupReducer using Ramda’s prop function.
Import it

And use it
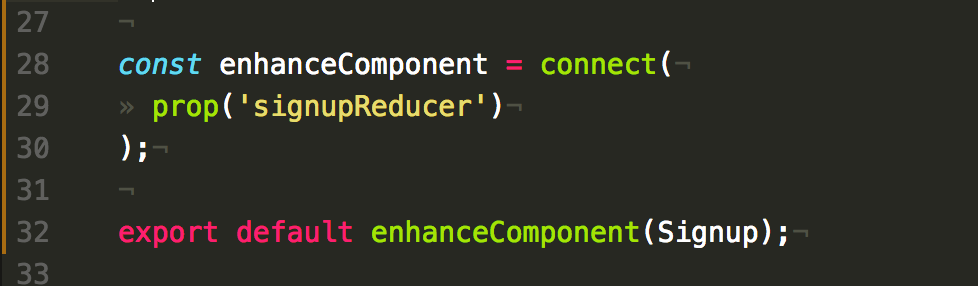
As you see, prop’s first argument is the property name to grab, signupReducer, but shouldn’t the second argument be the actual object?
It is, prop’s just curried.
Currying a function means you don’t need to provide all the parameters at once. You can supply some params, and a new function expecting the others is returned. I wrote an in-depth article on currying if you’re interested.
This technique allows point-free programming, or calling functions without mentioning the data they’re operating on. We just call prop(‘signupReducer’) and a new function expecting the object gets fed to connect.
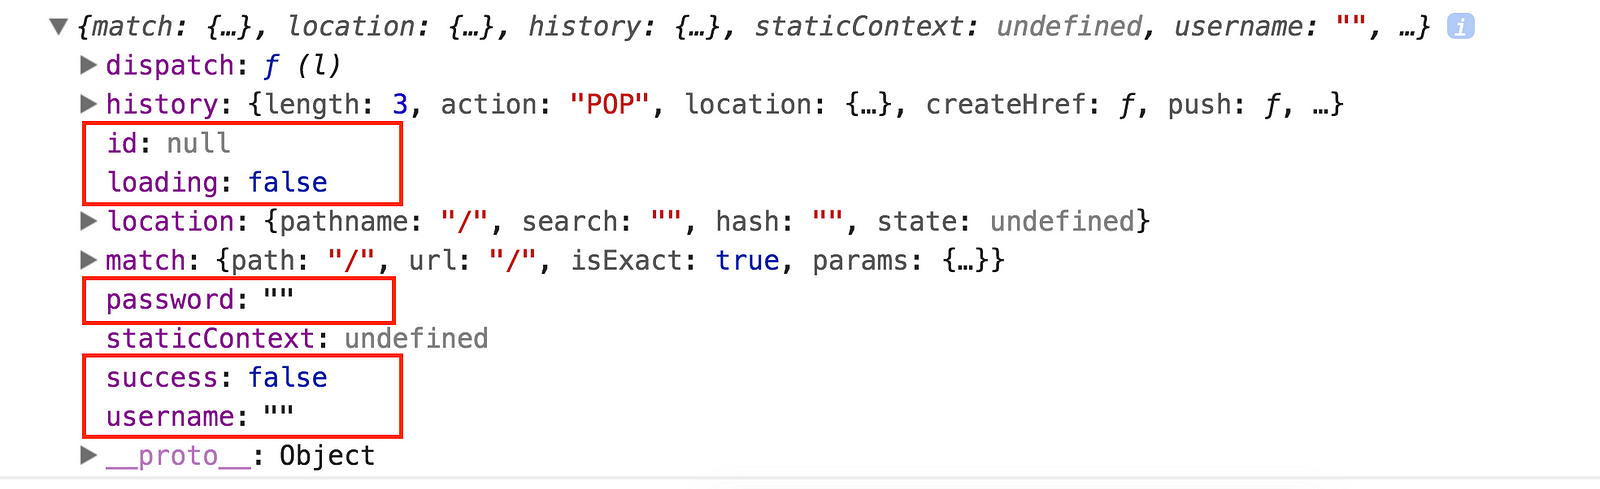
For fun, you can console.log(props) and see what connect() gave us.
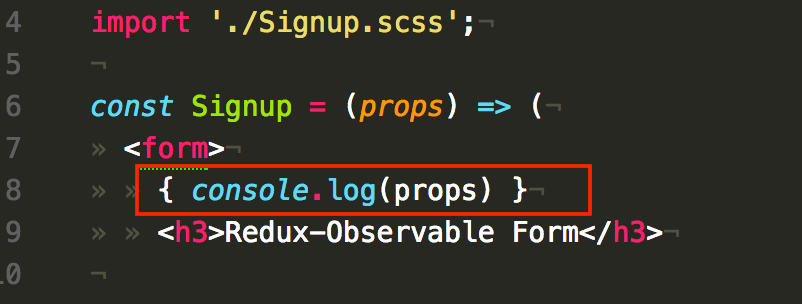
Looks like our reducer’s state made it!
A natural next step would be creating handlers. I believe we’ll need three:
- An update username handler
- An update password handler
- A form submit handler
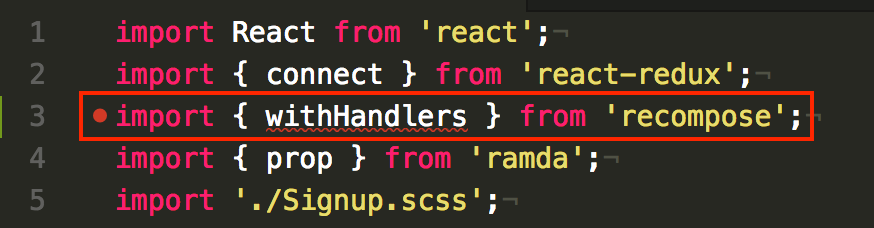
Here comes our first Recompose helper function: withHandlers.
It’s aptly named too! withHandlers is a higher-order component that takes an object of handler creators, passing them to a “Base component” as props.
Import it
And use it downstairs. We’ll write a test function to demo withHandlers.
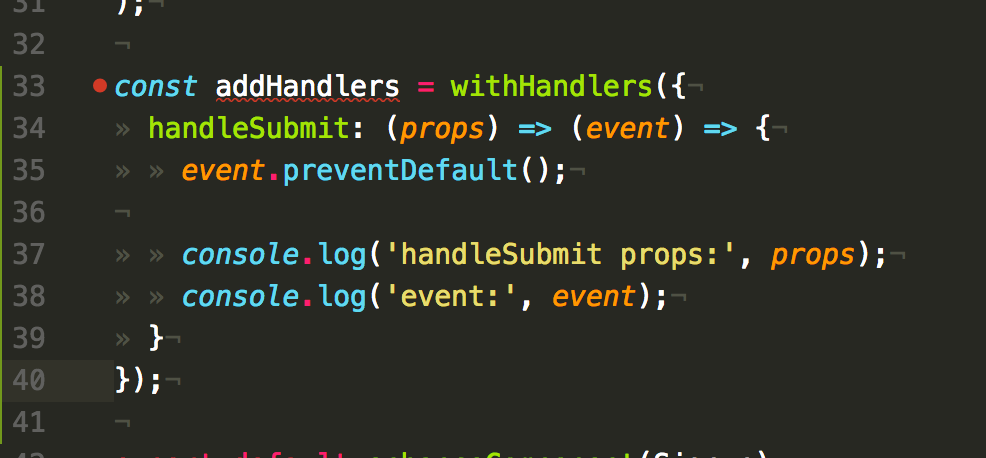
As previously mentioned, you give withHandlers an object of handler creators, which are higher-order functions that receive the component’s props and return a new function. In handleSubmit’s example, the function is an event handler.
I love it because normally, you’d need to extend React.Component to create handlers, but Recompose abstracts that away, letting you write plain ol’ functions.
It’s actually on my list of favorite Recompose functions.
Before you add this to your JSX!
Remember withHandlers returns a higher-order component, meaning it’s a function expecting a base component, only then will you get back JSX.
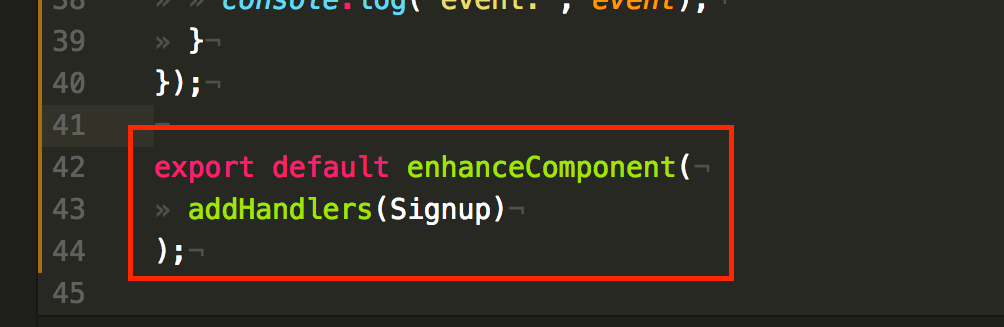
So we must feed Signup to addHandlers.
But wait, wait, wait… I’m personally not a fan of nesting functions like this. There must be a better way to compose them. 😏
Luckily Recompose also carries that little helper.

compose is just like compose in any other functional programming library–it lets you combine n functions, each passing its output to the next.
Let’s refactor our enhanceComponent variable. It only connects you to Redux right now.
We can fuse connect and withHandlers using compose!
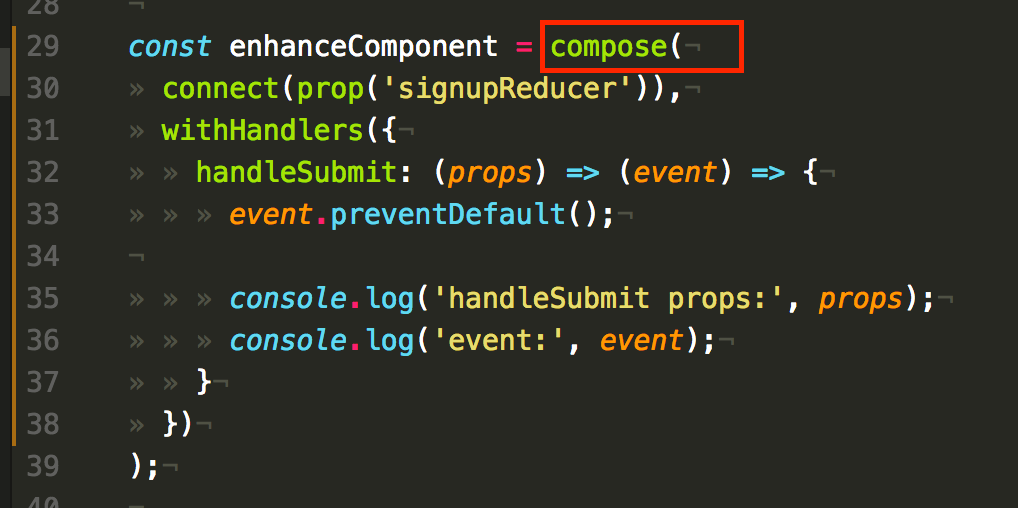
This is possible because both connect and withHandlers return higher-order components when you invoke them! Composing these two returns you a function that expects a base component.
Which means we can return our export to its original form.

See? enhanceComponent needs to be invoked with Signup to do its magic.
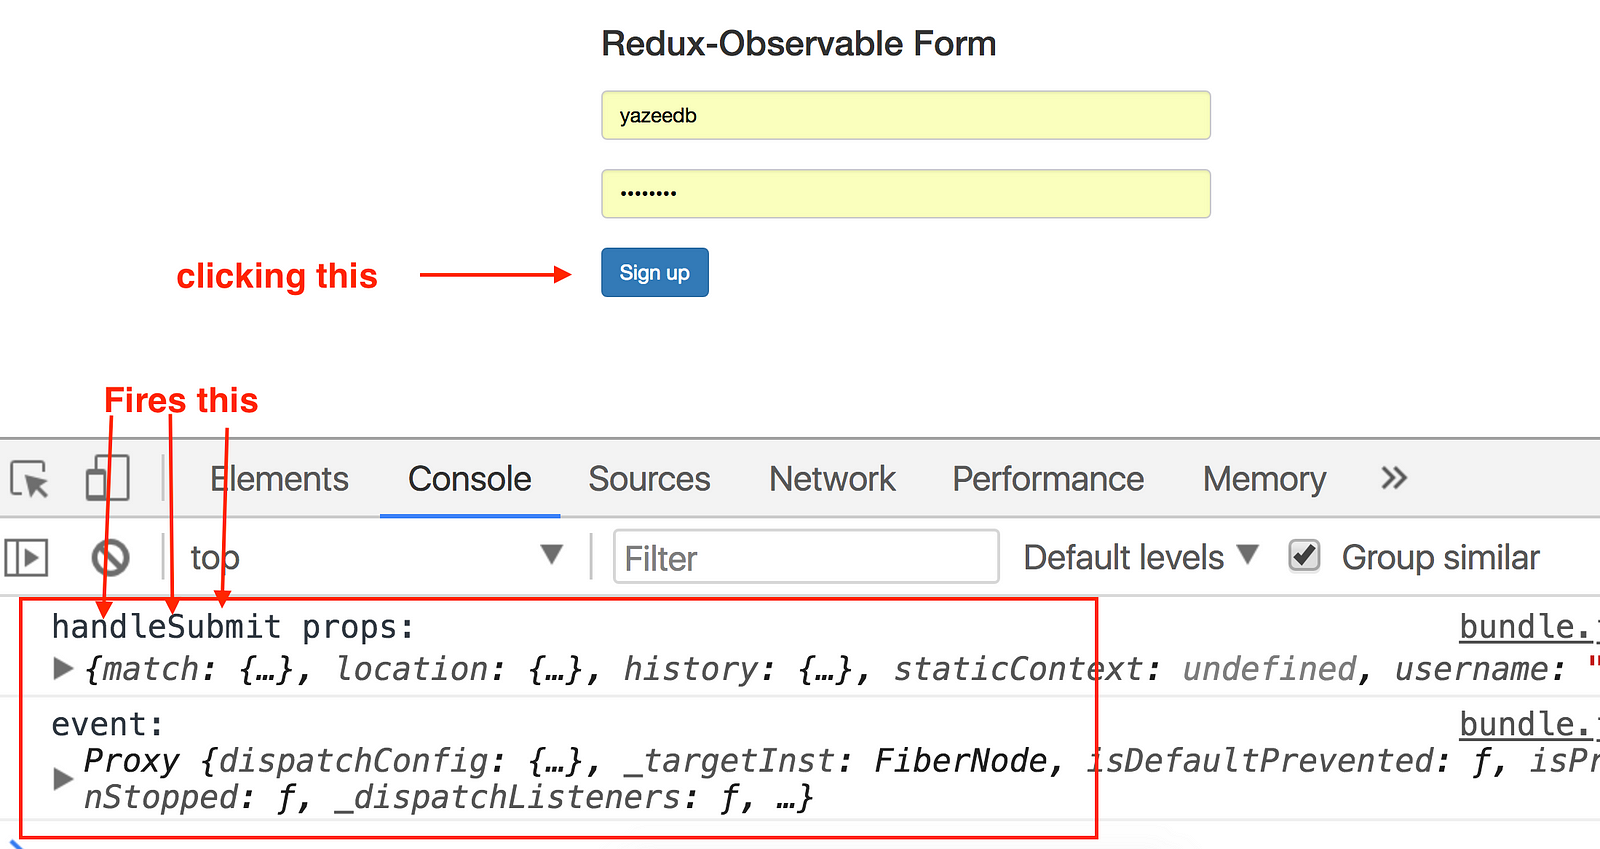
Refresh the page and see your console.log(props). handleSubmit is now a prop!

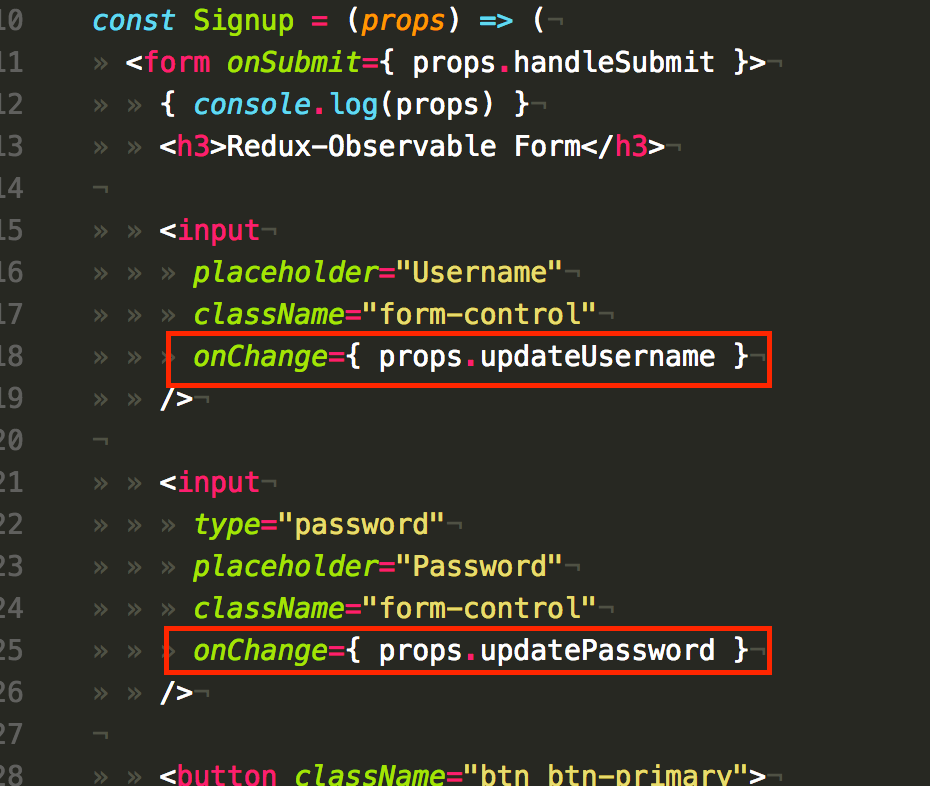
Let’s wire it up in the JSX.
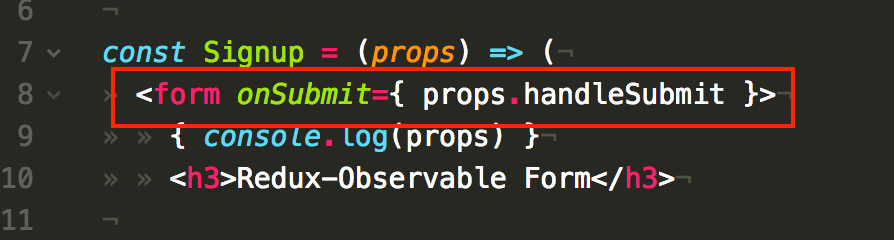
Refresh and click your button.
Now that we’ve demoed withHandlers, we can write the actual handleSubmit functionality.
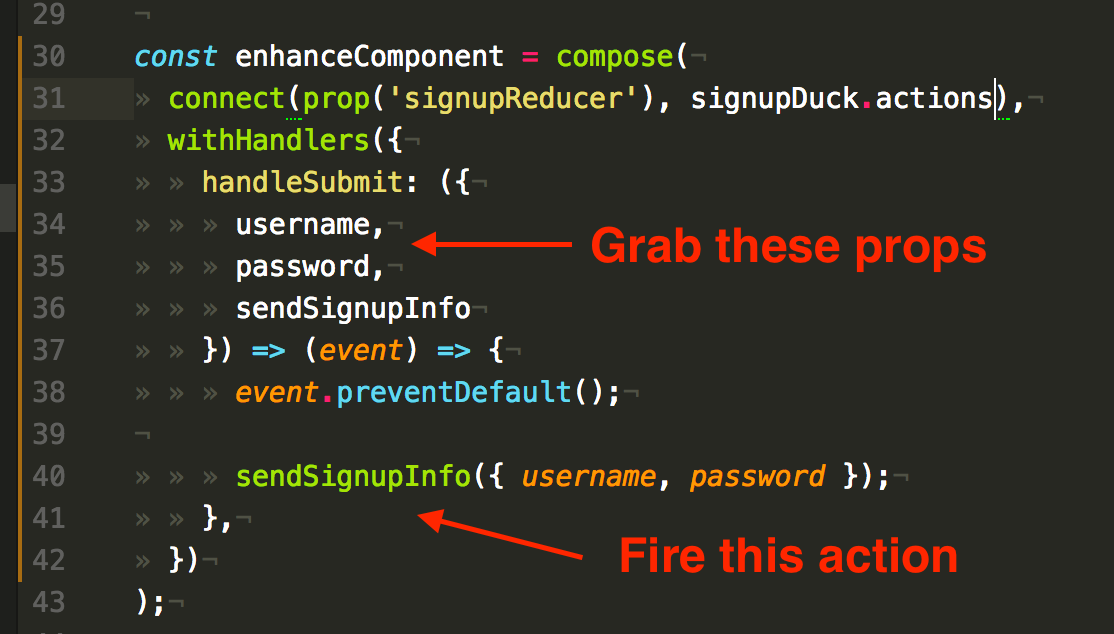
Since withHandlers provides handleSubmit our props, we’ll grab username, password, and sendSignupInfo from them.
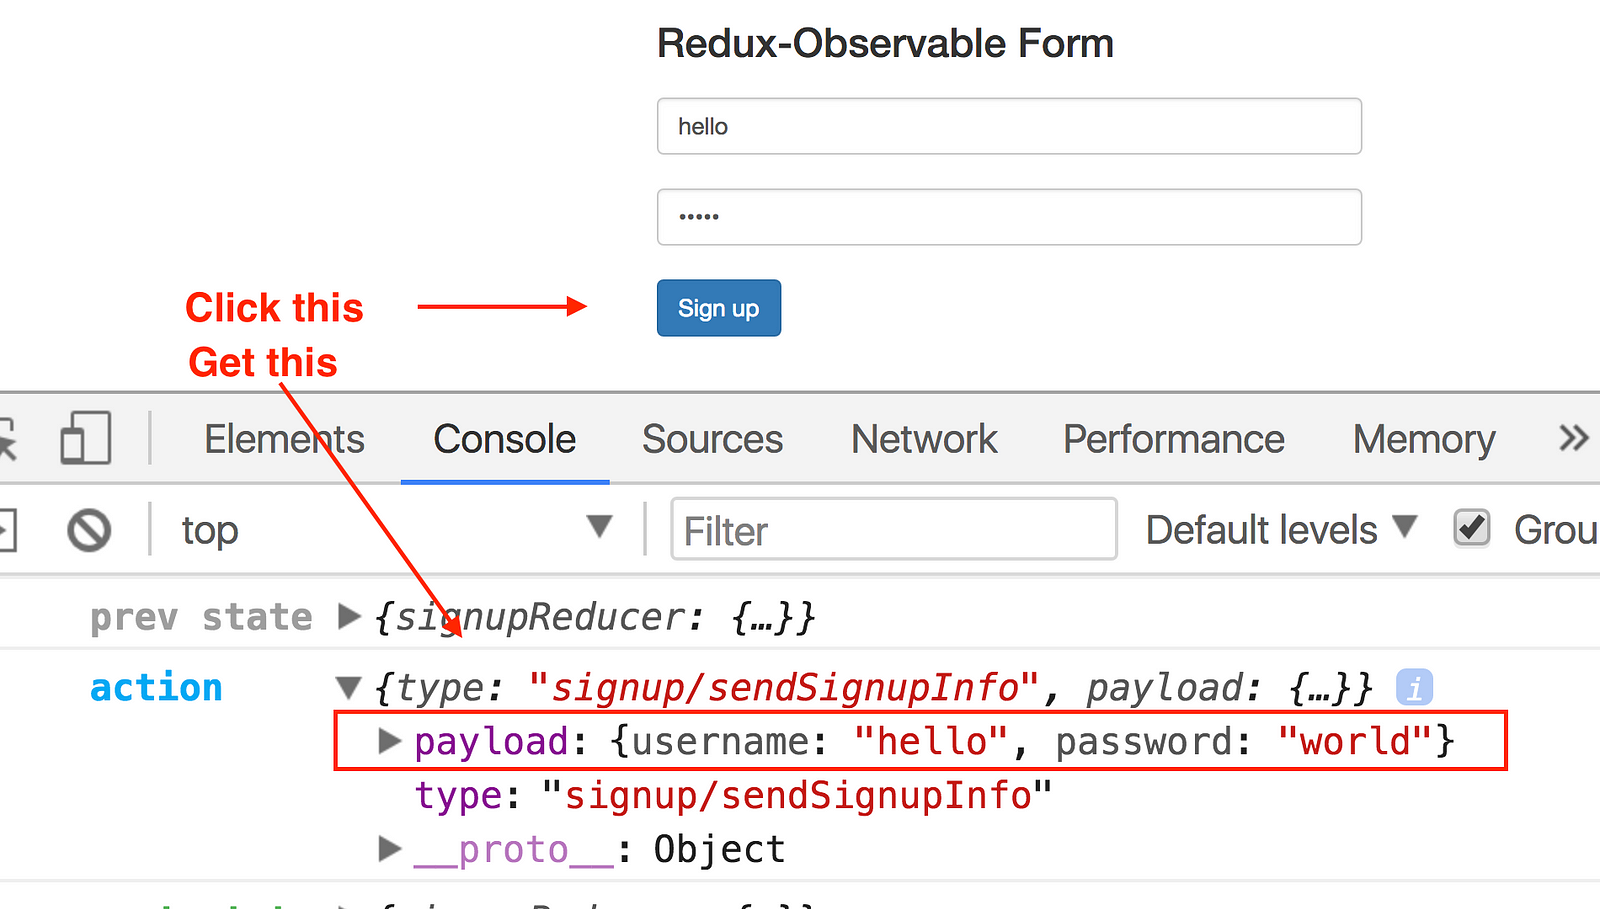
Our handler calls event.preventDefault() to prevent page reload, and the sendSignupInfo action gets fired with our form data.
If you have something like redux-logger, your browser console will be notified.
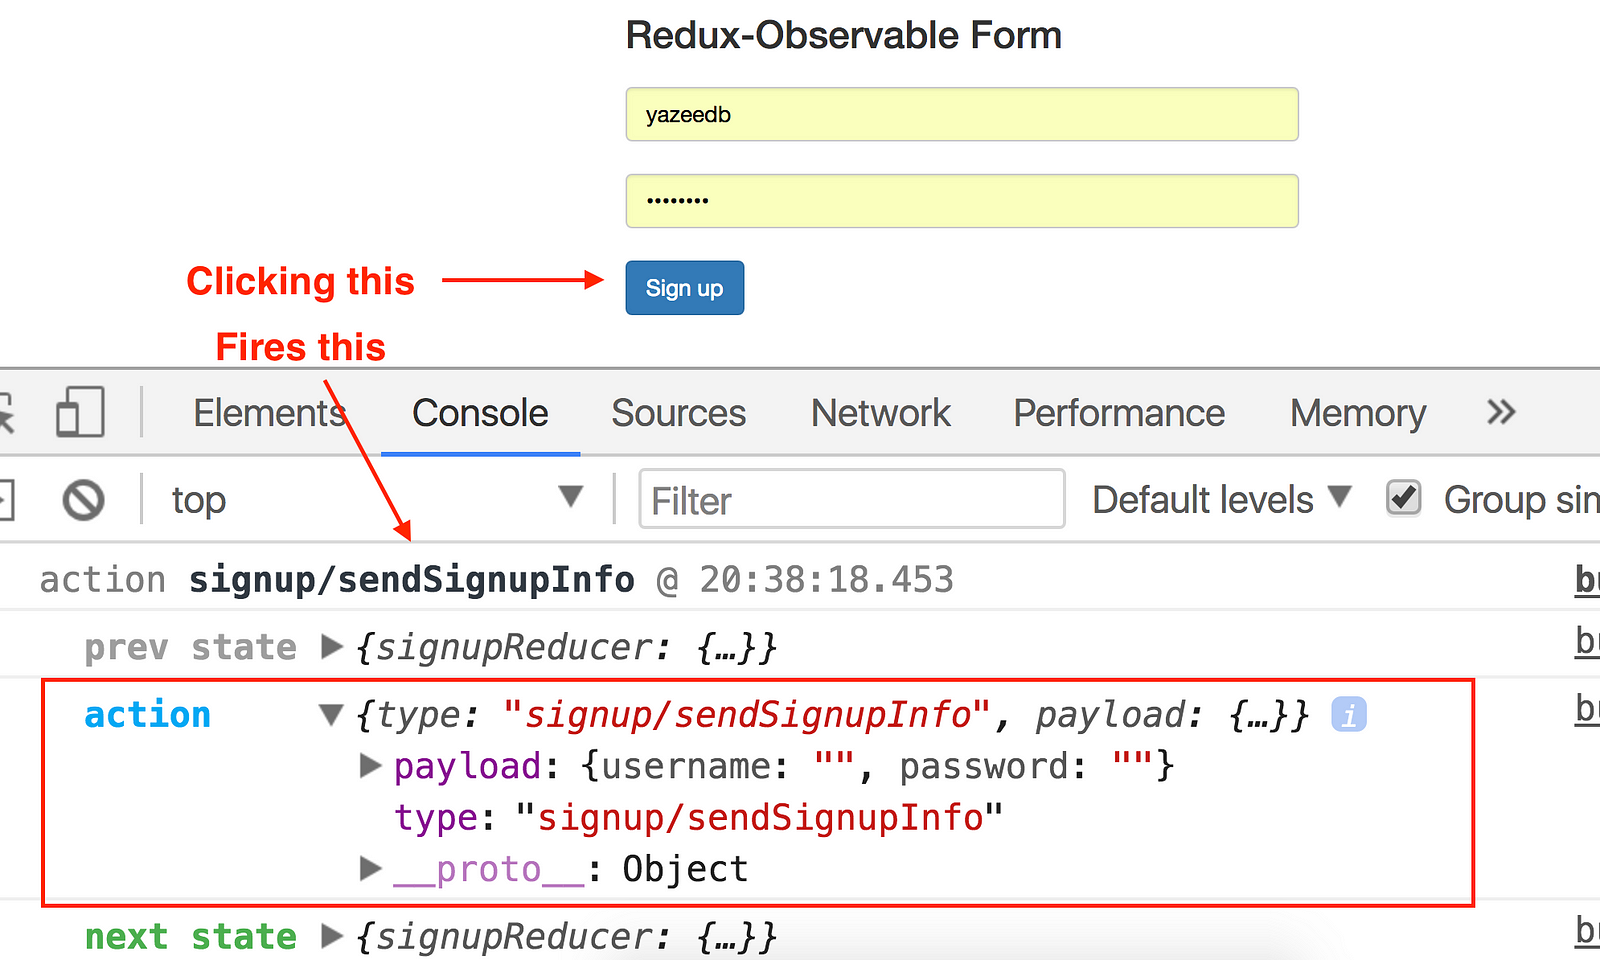
Because remember we defined this action in Signup.duck.js.
But we have no username or password! Let’s add their handler creators.
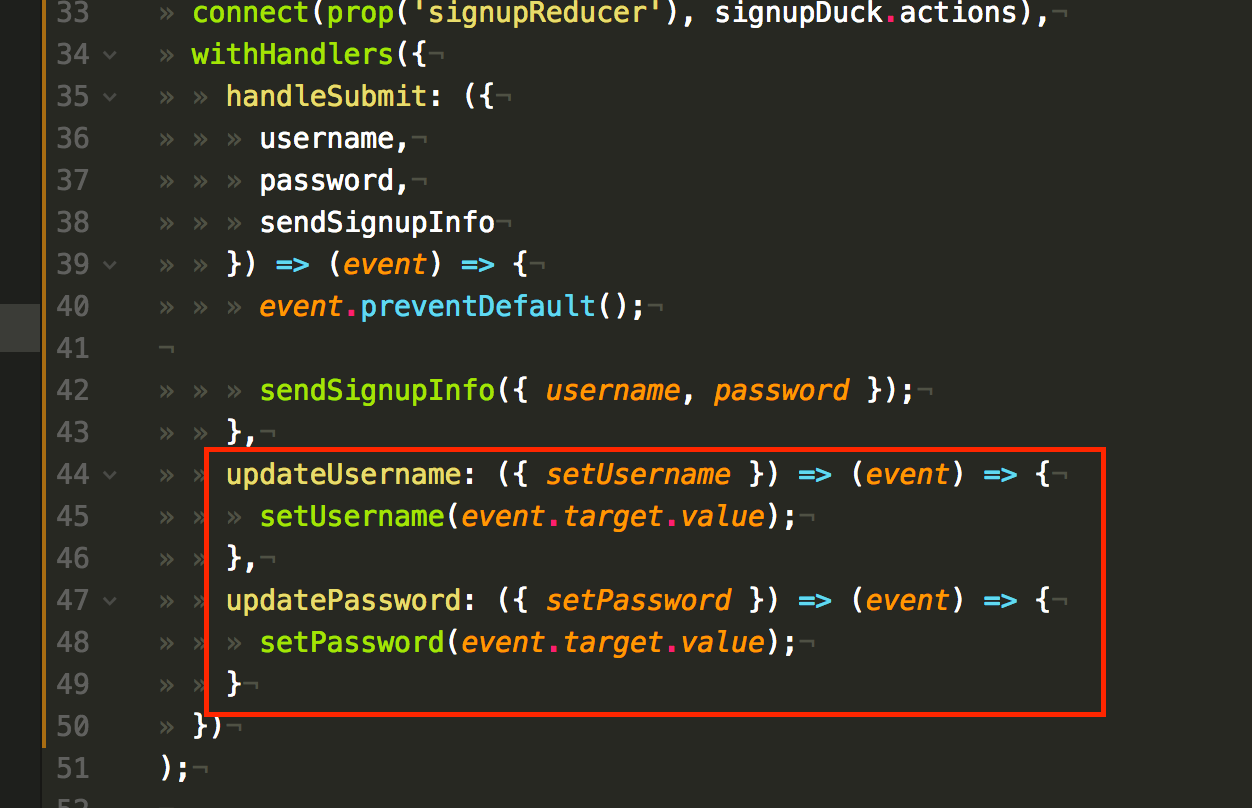
For both username and password, we’ll take their relevant set action, and pass event.target.value to them.
If you’re feeling adventurous, we could inject some Ramda into this. The path function lets you extract nested object properties.
So instead of event.target.value
We could do path([‘target’, ‘value’])(event)
Import path (if you want).

Define getTargetValue.

Again, this is a curried function expecting the event object. We can use it like so.
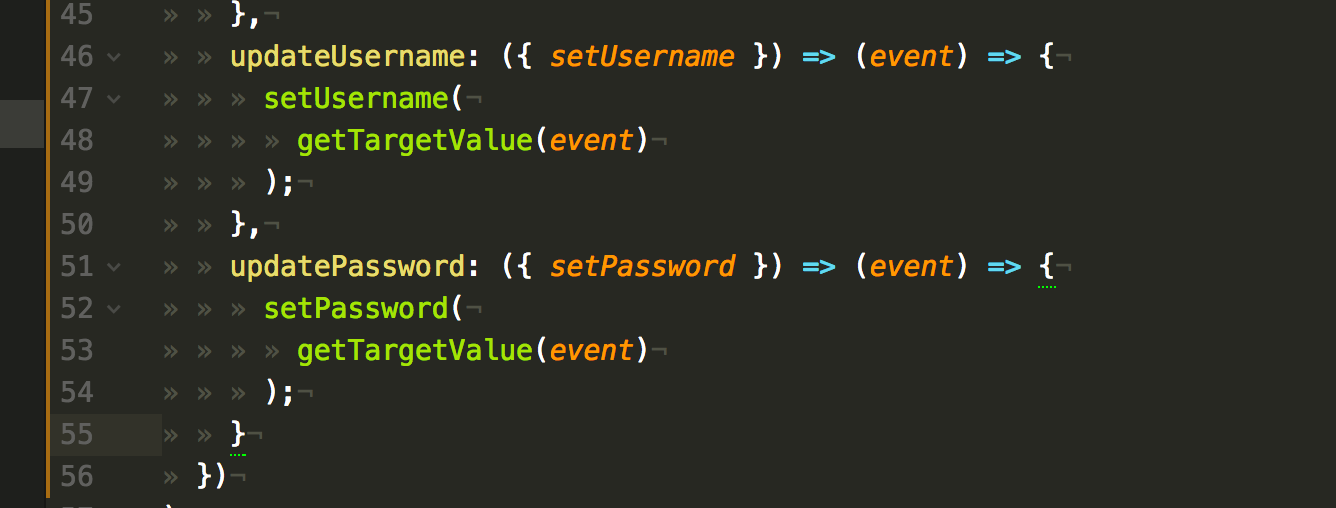
Bleh, nested functions! compose to the rescue!
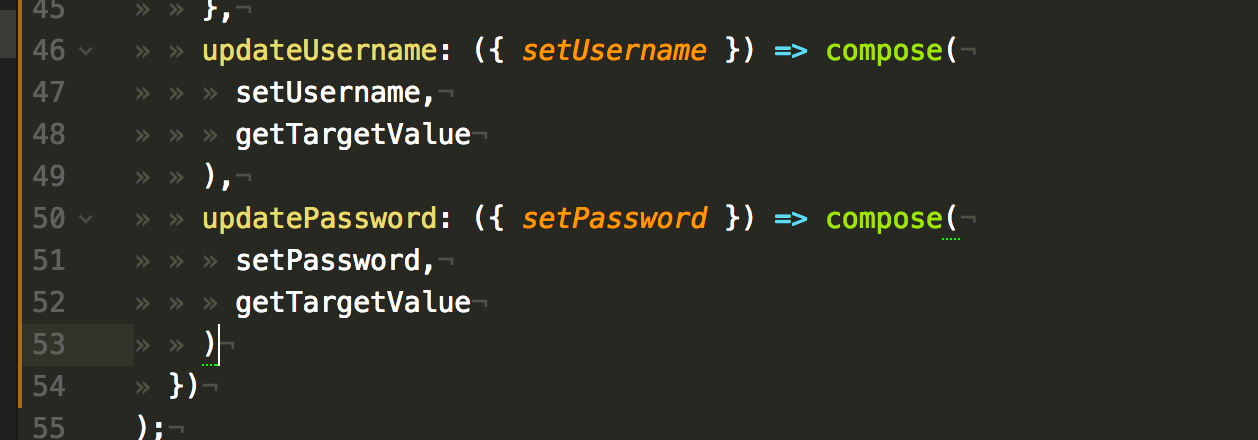
Much better. Let’s wire up our JSX again.
Refresh and see the magic.
And you’ll see it within handleSubmit.
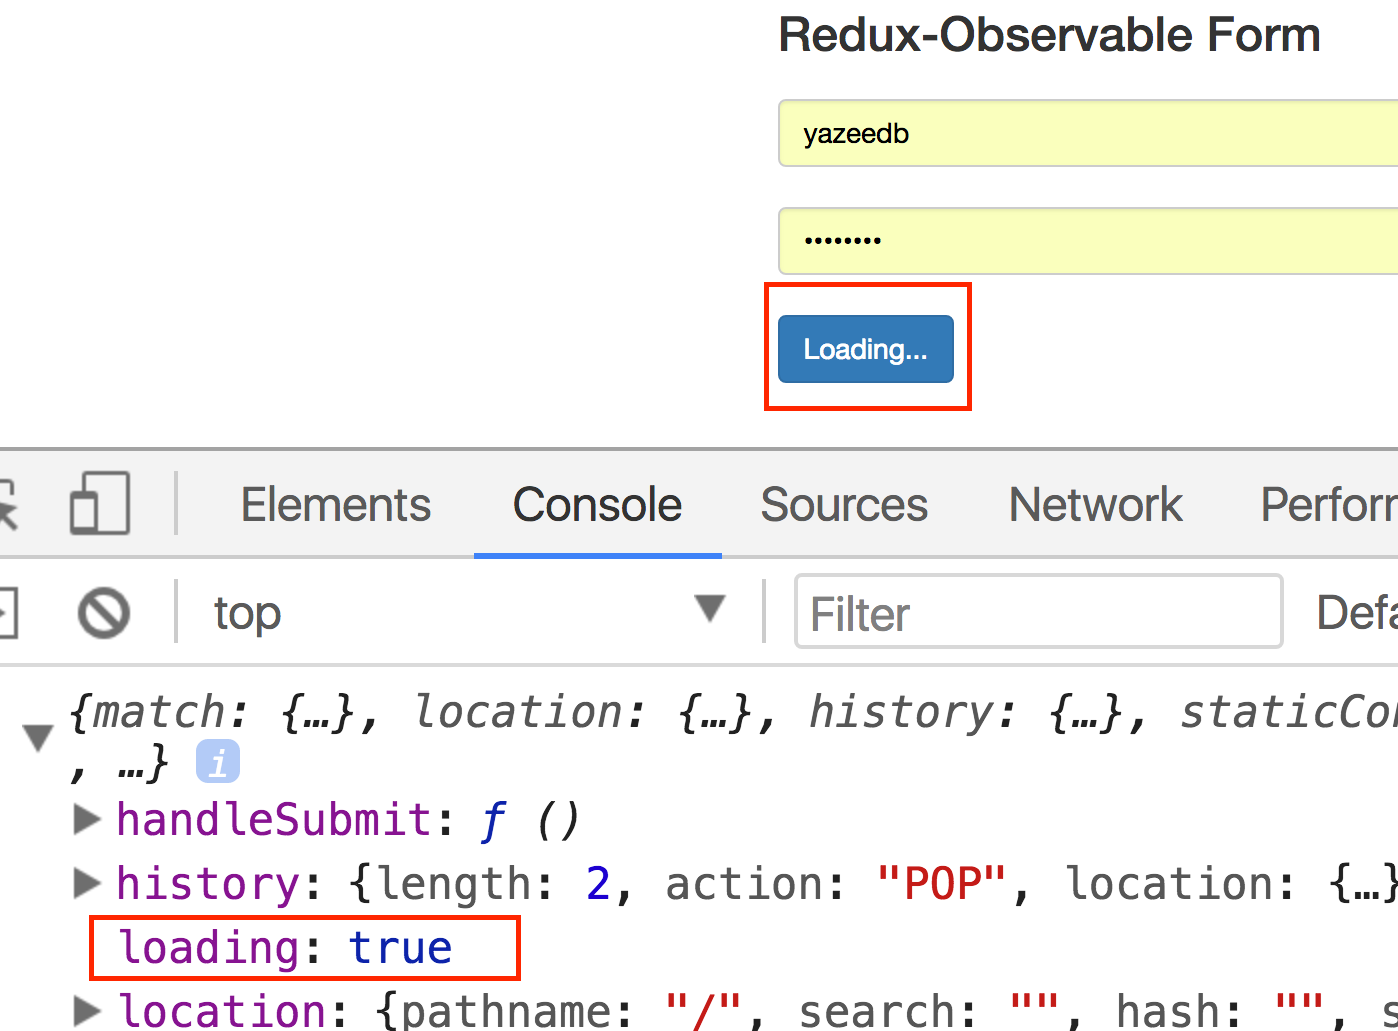
I almost forgot, handleSubmit fires our sendSignupInfo action, so our state’s loading property becomes true.

We can conditionally change our button’s text with a ternary.

Side effects
Our app, thus far, is 100% pure functions (except for console.log(props) 😆). They’re just inputs/outputs, and harbor no side effects.
But one small problem: How do you show the user anything?
We change the button’s text if loading: true, but how do we make API calls or further update the UI? You need side effects somewhere!
Enter Redux-Observable
Using the Epic pattern, Redux-Observable will be our side effect machine.
An epic is a function that receives/returns action streams.
Once we configure Redux-Observable, it’ll listen to incoming actions and respond if we tell it to.
Like I mentioned this uses RxJS, which’d be good to know from here on out. If you’re not familiar with it, maybe do some research. If not, just keep reading 😁.
Epic setup
We’ll add a folder: /src/epics.

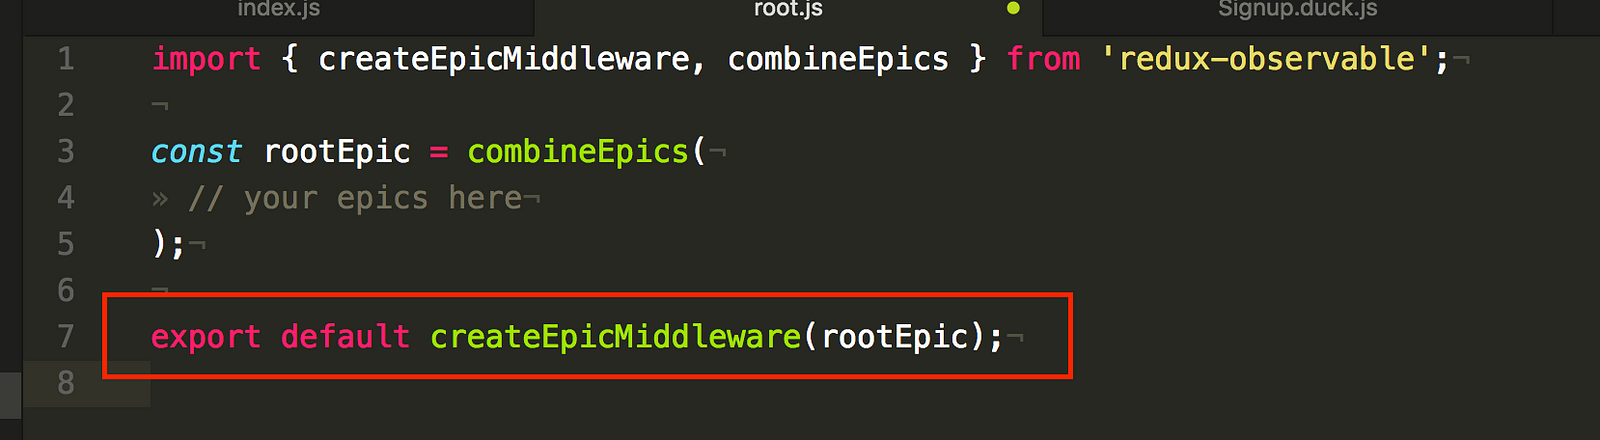
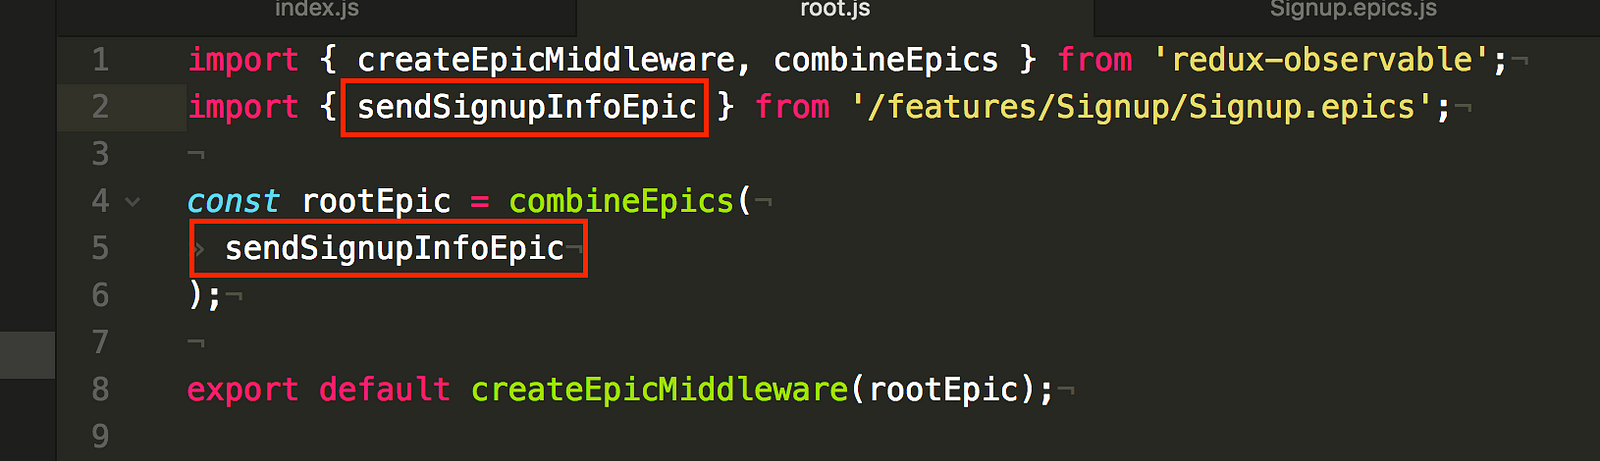
And create a root.js file. This is our root epic. It’s like a root reducer, housing the app’s epics in a single location. Our app only has one epic, but it’s good practice.
First we’ll import createEpicMiddleware and combineEpics.

combineEpics is like Redux’s combineReducers function, and it’s similarly used.

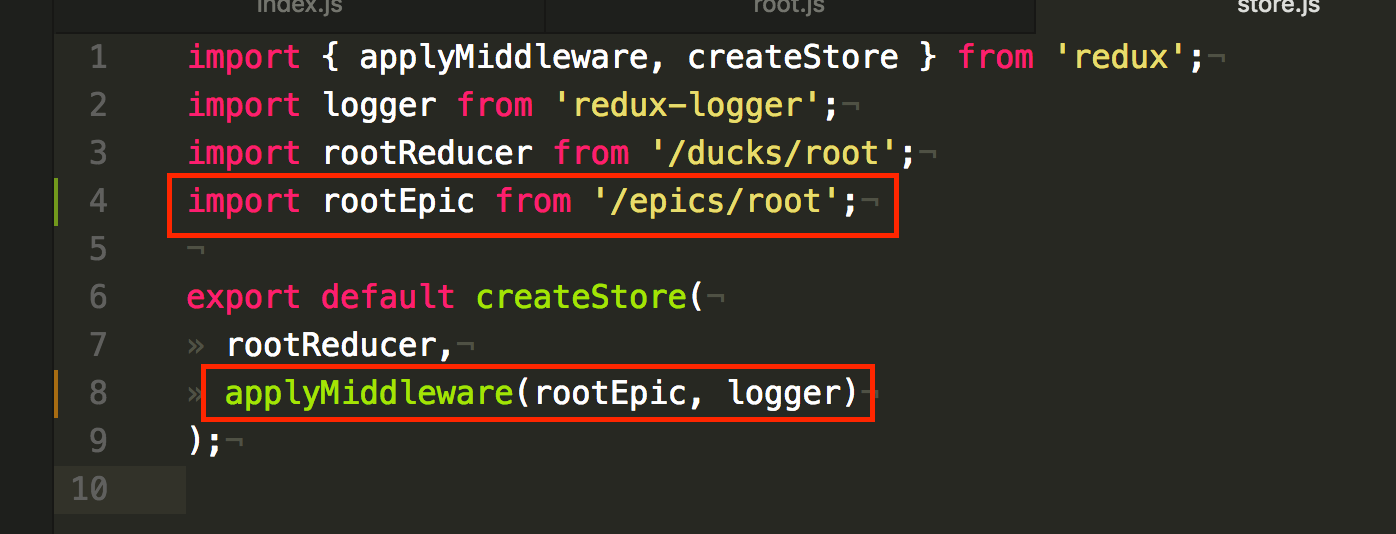
Once you’ve included your epics in rootEpic, export it in createEpicMiddleware.
Then use it like any other middleware in your Redux store.
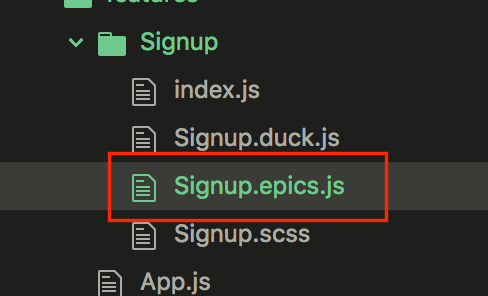
Now we write our epic. Create a new file: /Signup/Signup.epics.js.
Epic code
An epic receives and returns a stream of actions–actions in, actions out. A stream is a continuous flow, meaning actions can arrive at any time. Our epics are listening, waiting to act.
Here’s our epic’s initial code: sendSignupInfoEpic.

It’s just a function expecting an action stream: action$. Appending $ is common practice, as it lets other developers know that this variable’s a stream (Observable).
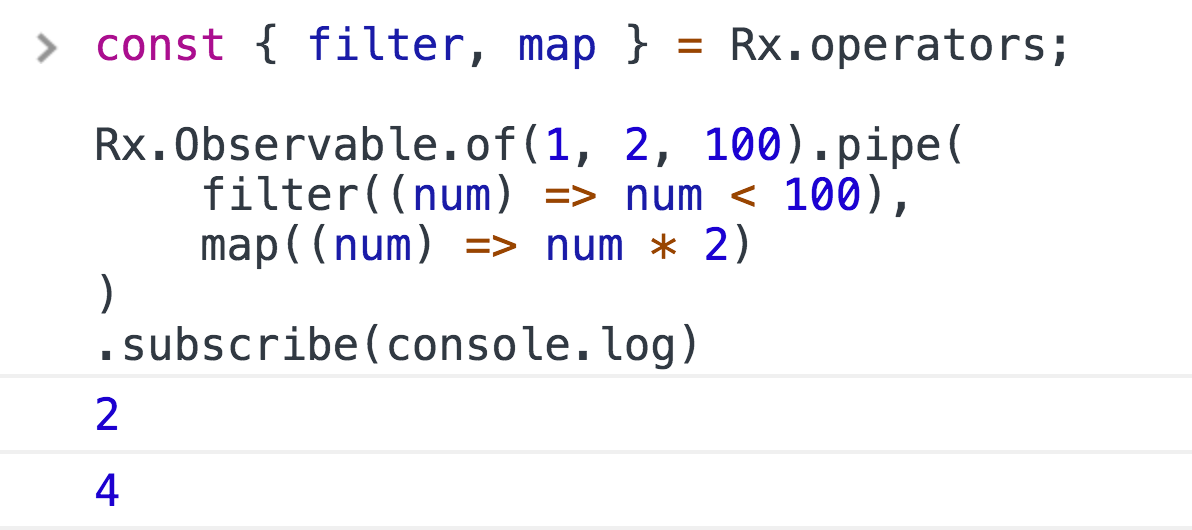
It returns action$.pipe(). Now we’re getting into RxJS territory.
RxJS version 5.5 shipped pipeable operators. You pipe your operators instead of dot-chaining them.
This
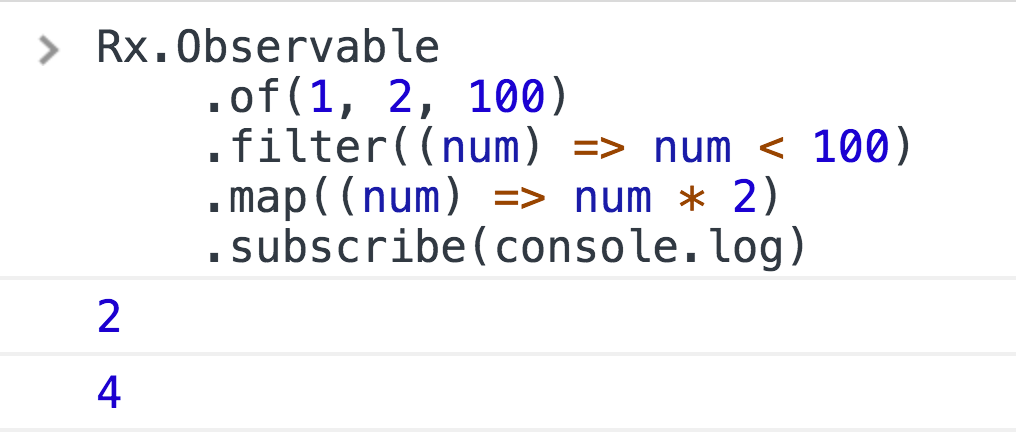
Is now this
Listen to an action type
Much like a reducer’s switch cases, an epic usually listens for one action. sendSignupInfoEpic, for example, only cares about the sendSignupInfo action, which is fired during form submission.
Let’s import signupDuck and extract its sendSignupInfo action.
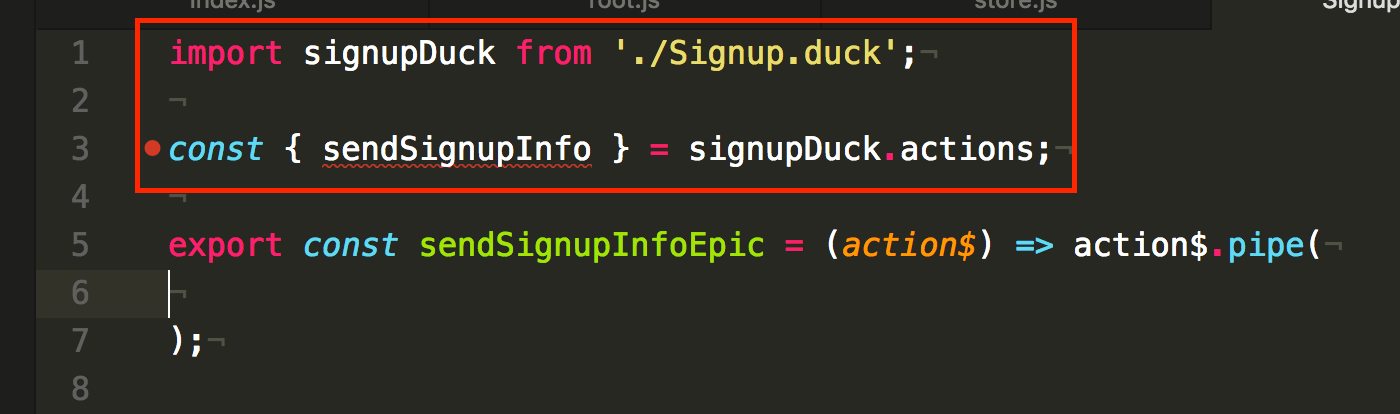
Since I’m using autodux, sendSignupInfo.type tells me the action type. Now we must tell sendSignupInfoEpic to look for it.
But how?
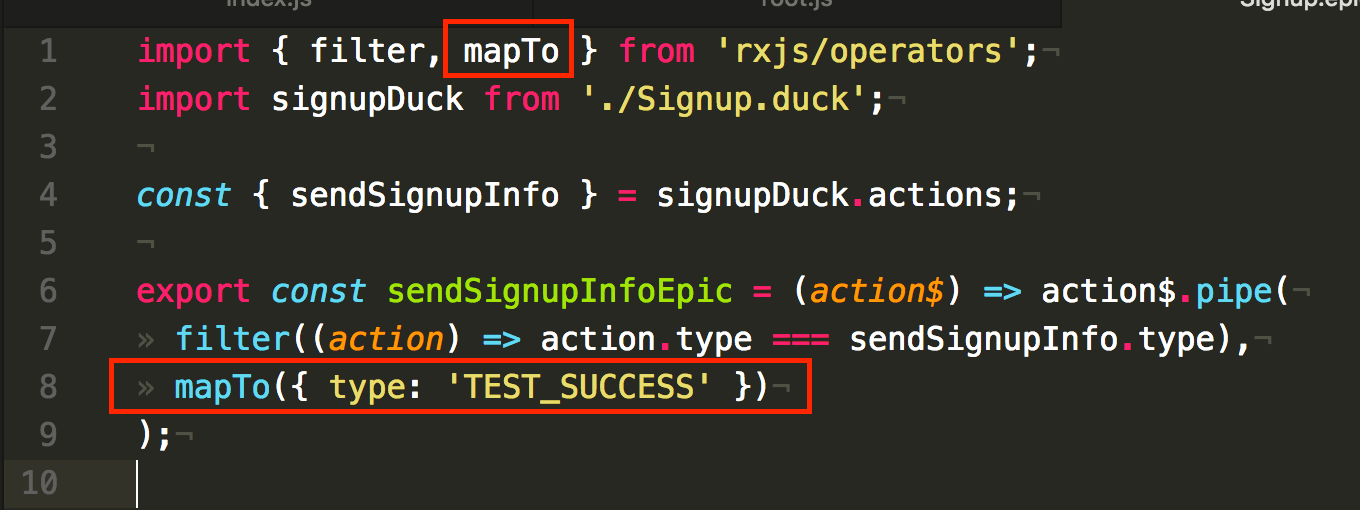
A classic RxJS solution would be the filter operator.

Just to test if this works, we’ll import the mapTo operator to directly map sendSignupInfo.type to another action.
Include sendSignupInfoEpic in your root epic.
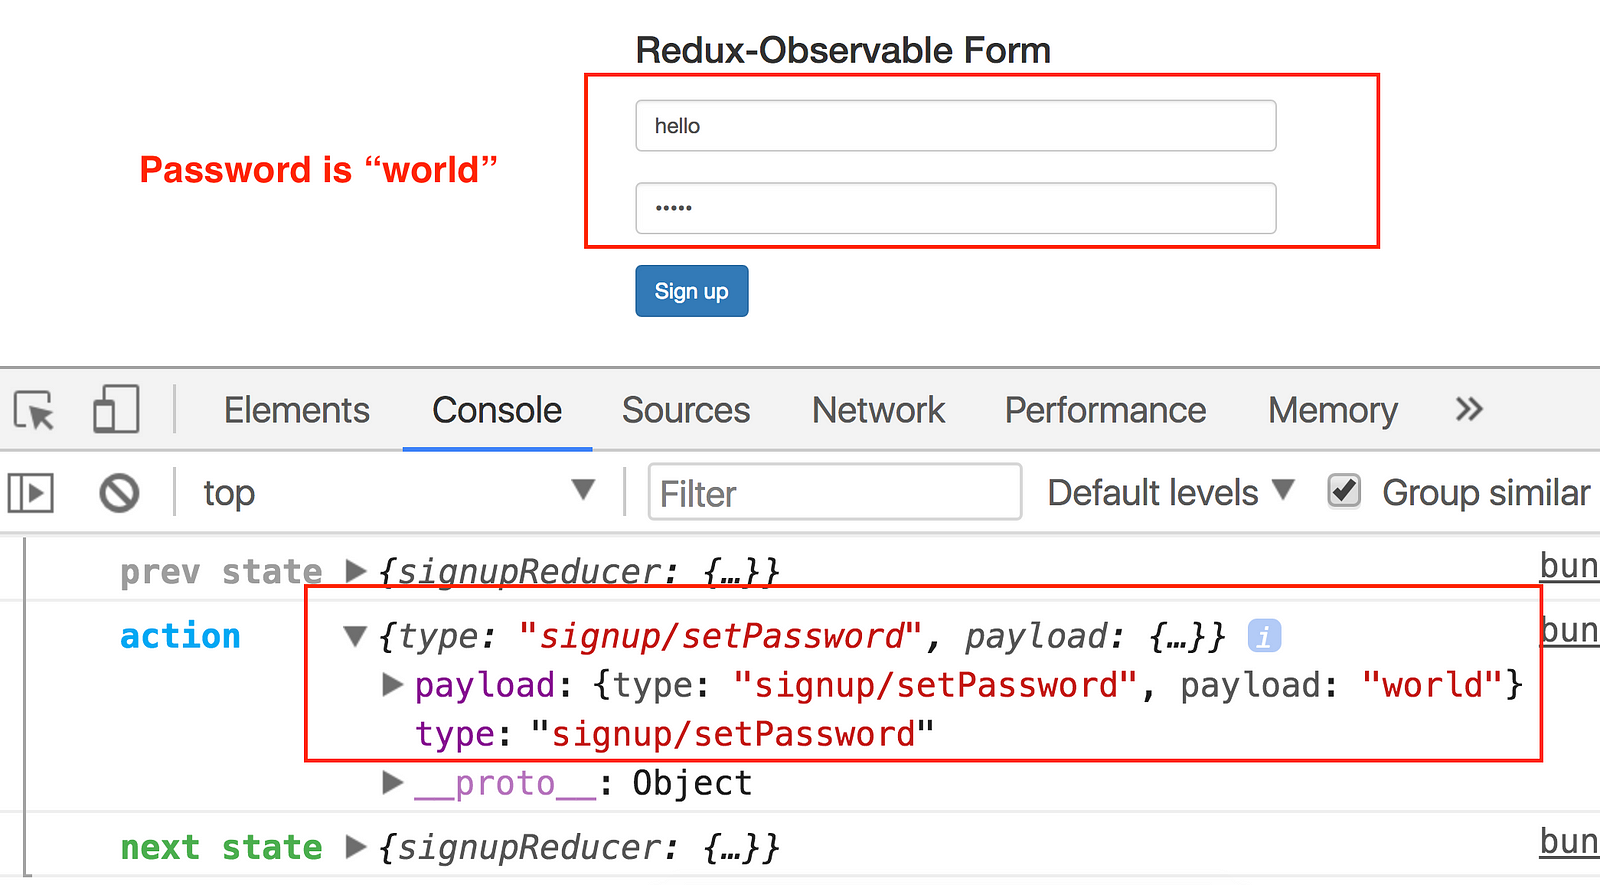
And submit the form to see our epic chase sendSignupInfo.
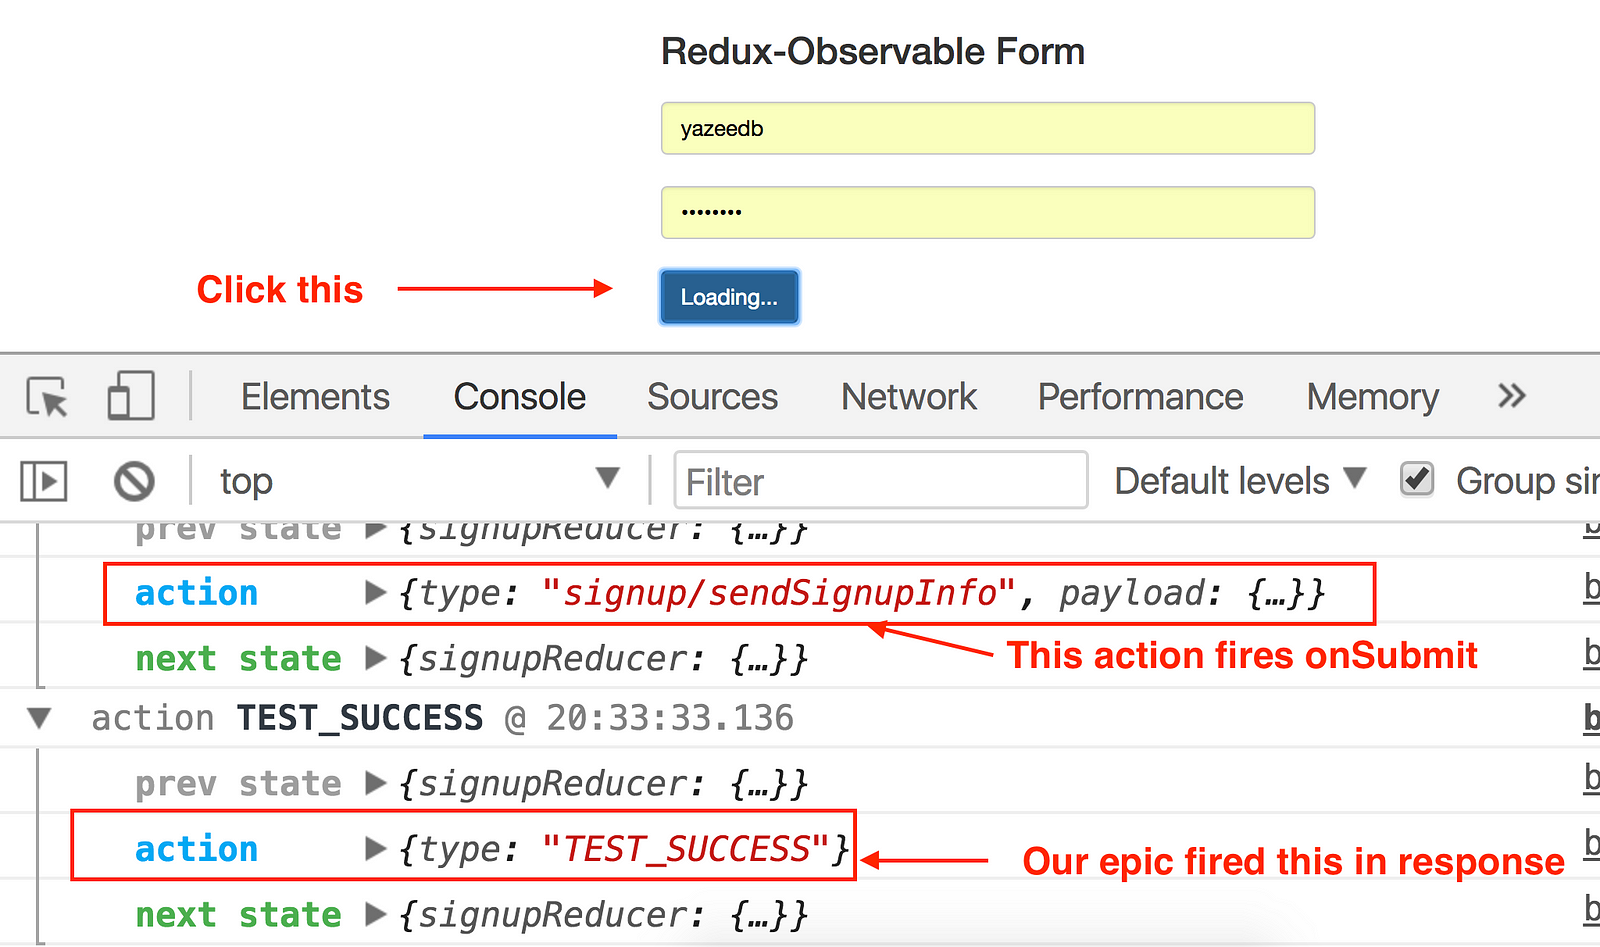
Our epic immediately fires TEST_SUCCESS after seeing the signup/sendSignupInfo action type.
I’d say it’s good, but remember how we used filter to determine the proper action type?
The creators of Redux-Observable recognized that filtering for a given action type’s such a common use case, that they created an operator called ofType.
Replace your filter import with ofType from redux-observable.

And use it like so
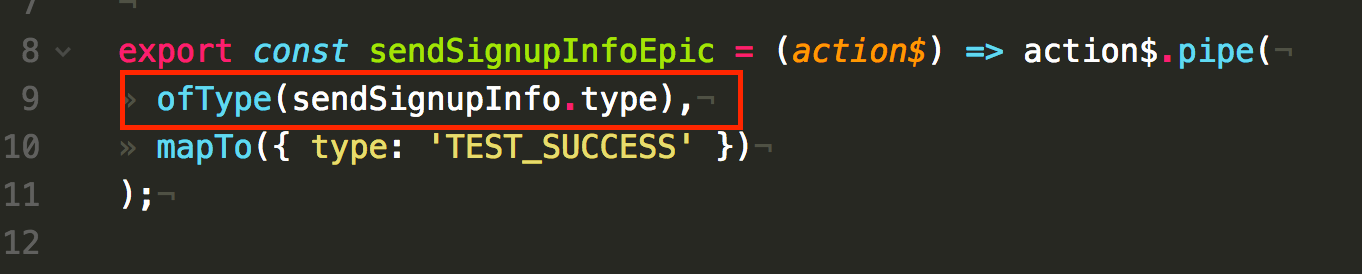
The resulting code’s a bit cleaner! 😃
Moving on, we want our epic to grab the username and password from the action’s payload and send them to an API for signup.
With a quick Google search, I found https://jsonplaceholder.typicode.com/, a REST API to easily test your HTTP calls. We’ll send our username/password there.
Use the url https://jsonplaceholder.typicode.com/users.

To make the API call, we can use RxJS’s ajax function. This wraps an AJAX call in an Observable, allowing easy integration with our epic.

Now for the epic’s real functionality. We’re already filtering for the correct action type, now we need to make the API call.
The Redux-Observable docs use the mergeMap operator to make an API call in an epic. Here’s the code.
Replace mapTo with the mergeMap operator.

And use it in the pipe. Its first parameter is our targeted action.

We’ll put the AJAX call inside mergeMap.

mergeMap allows us to nest Observables and switch from one to the other. In this case, we’re done listening to the action$ Observable and wish to create a new Observable: ajax().
This new Observable will emit a value upon receiving an HTTP response. Let’s console.warn it using the tap operator.
Import tap.

And use it within ajax.pipe().

Refresh, submit your form, and find the warning.
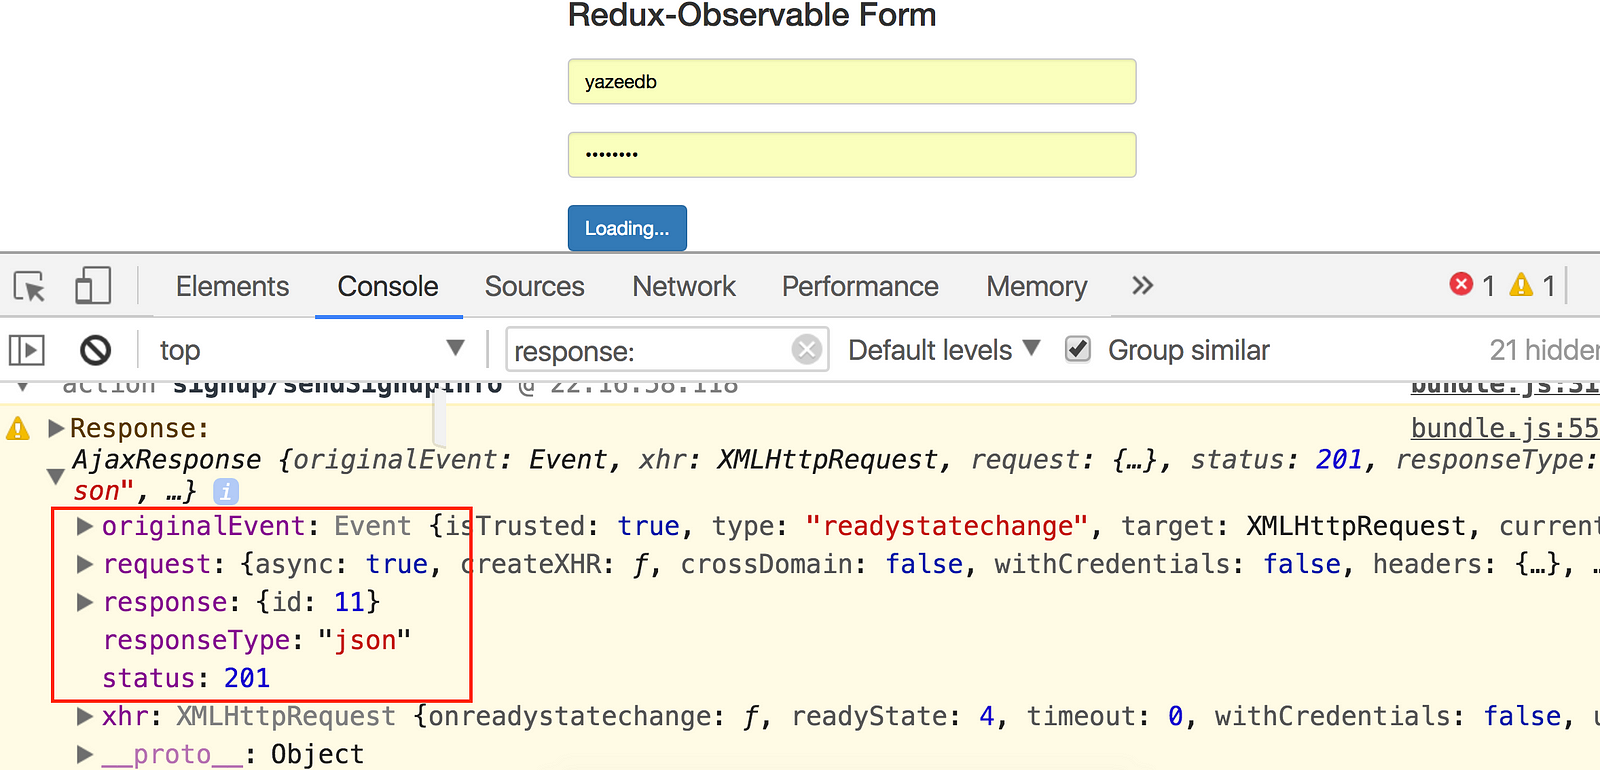
Looks like our epic’s sending the HTTP request and receiving a good response! We’re only interested in the response: { id: 11 }, piece, though.
Luckily, RxJS provides the pluck operator, which lets you extract an object’s properties.
Replace tap with pluck in your import statement.

And use it downstairs.
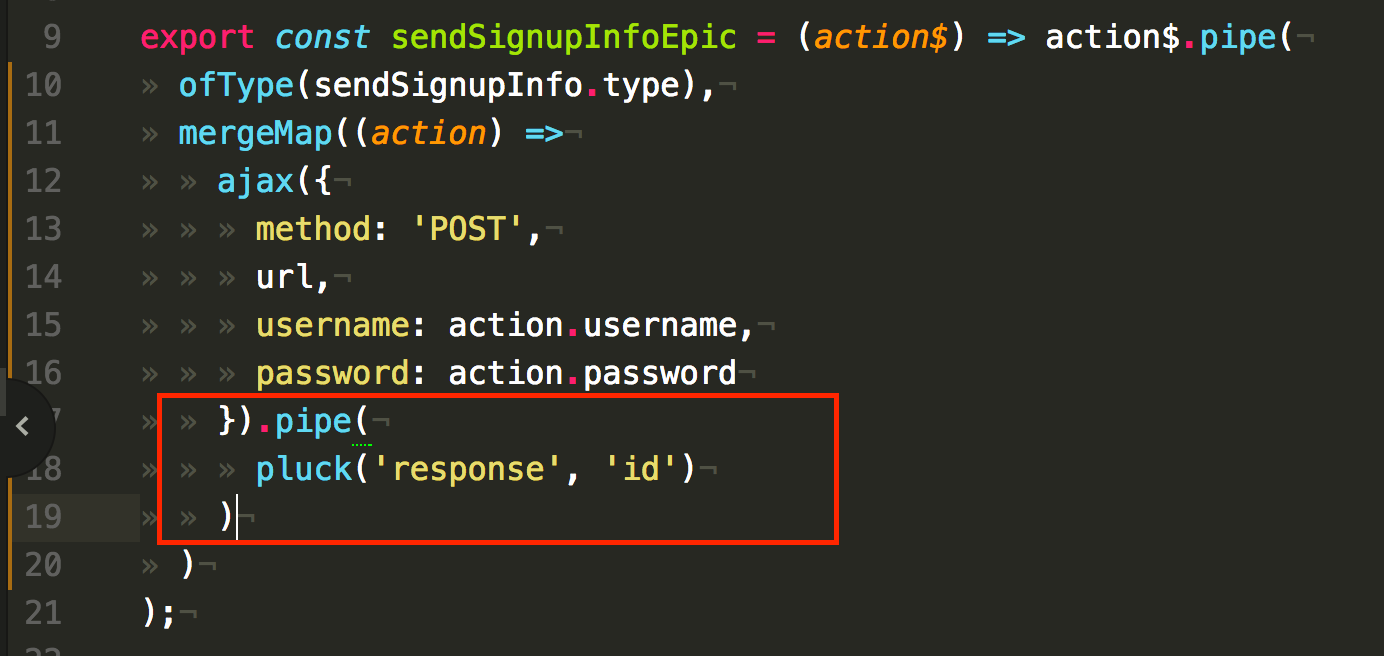
This will grab responseObject.response.id for us. If you supply multiple property names, pluck acts like Ramda’s path function that we used to grab event.target.value.
Remember path([‘target’, ‘value’])?
We can do pluck('response', 'id').
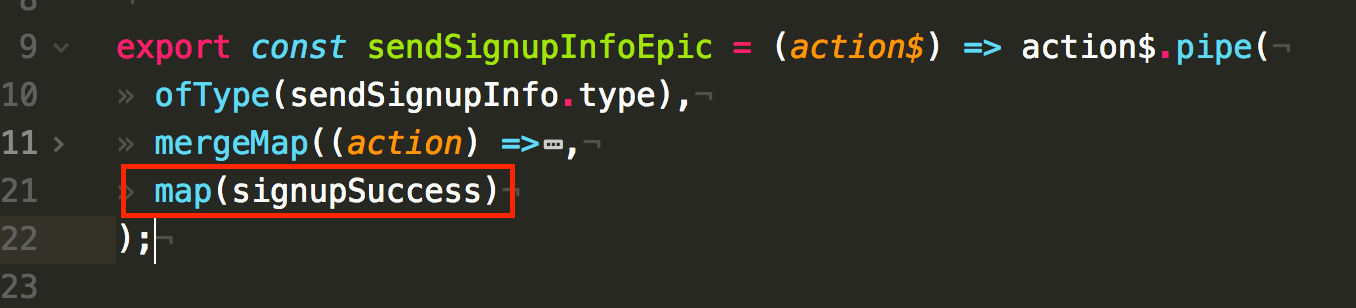
Now we must complete the epic contract–actions in, actions out. We had an action come in, but we’ve yet to return one.
Here’s our last operator: map.
Probably self-explanatory–map lets you somehow change emitted values. We’ll use it to create our output action.
Grab signupSuccess from signupDuck.actions.

Import map.

And use it after mergeMap to fire signupSuccess.
Refresh and watch.
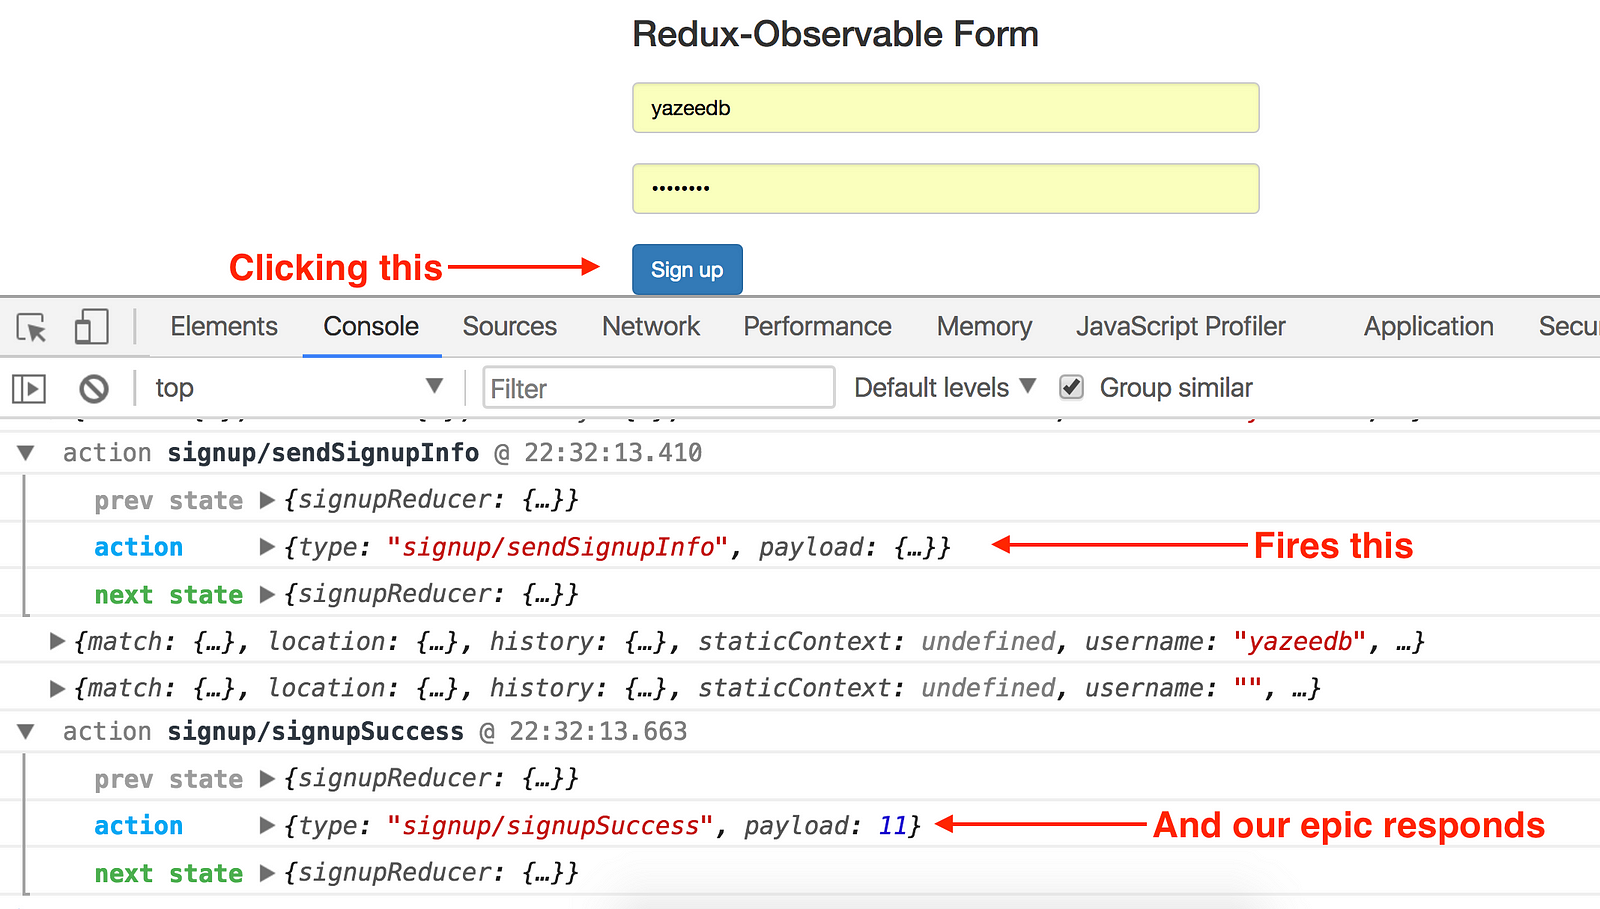
If you’ve been paying attention, you know that signupSuccess sets loading back to false. That means our UI’s button should go from “Sign up” to “Loading…” and back to “Sign up”.
If you like, import the delay operator and let it go for 3 seconds.
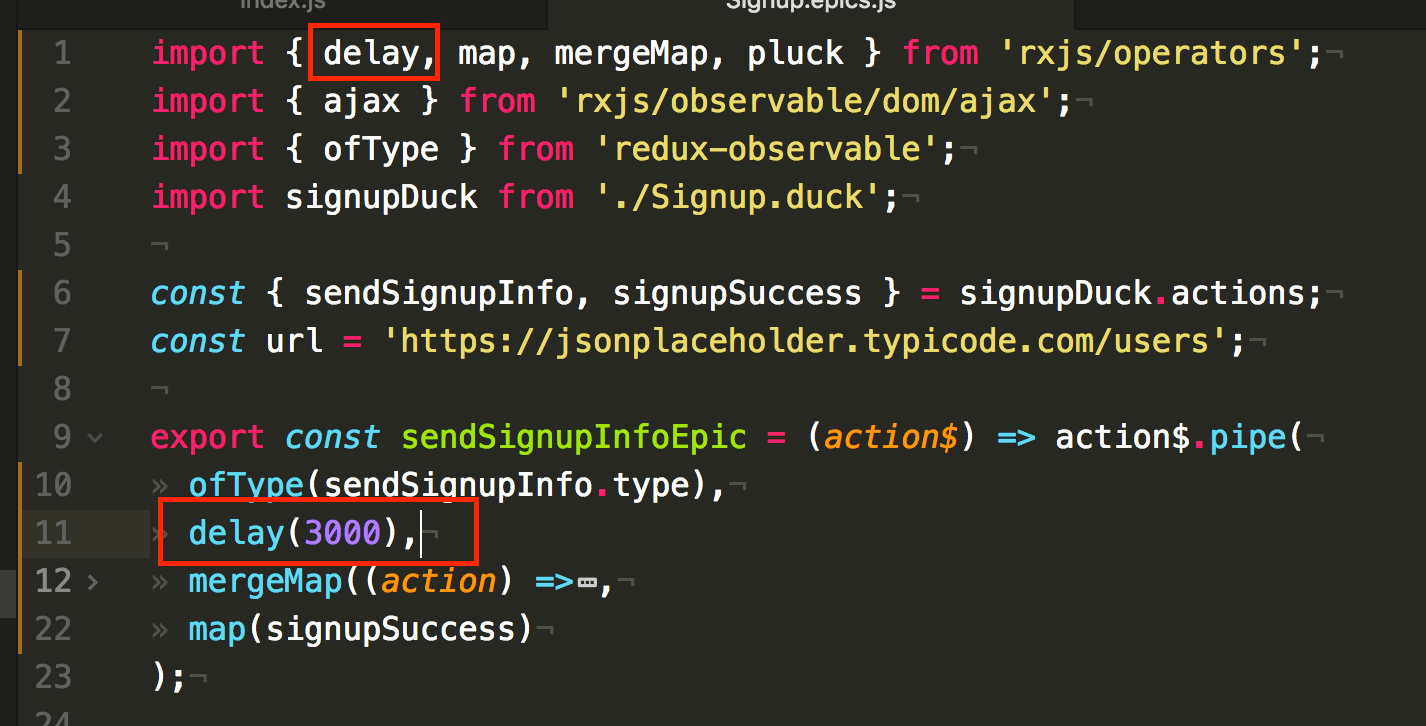
Now you can easily see the button changing text in response to the fired actions.
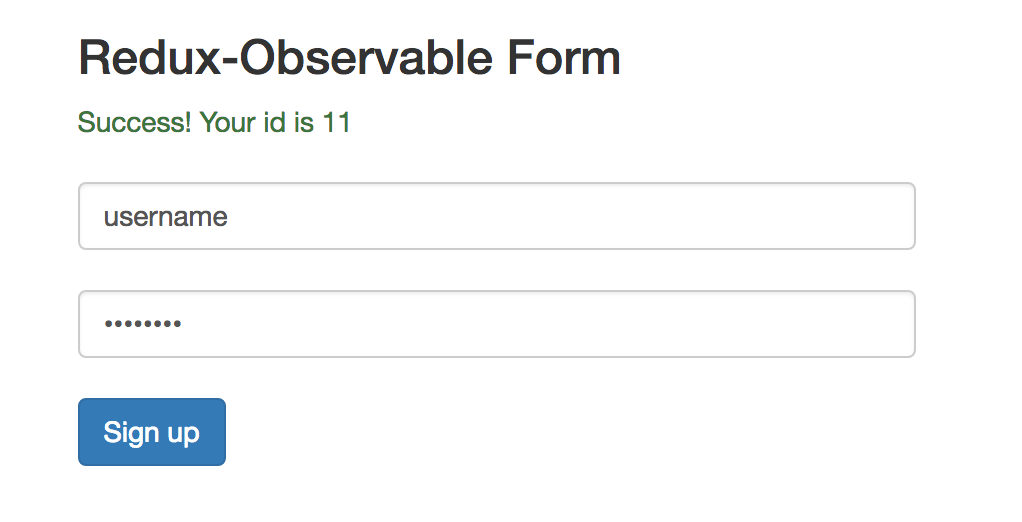
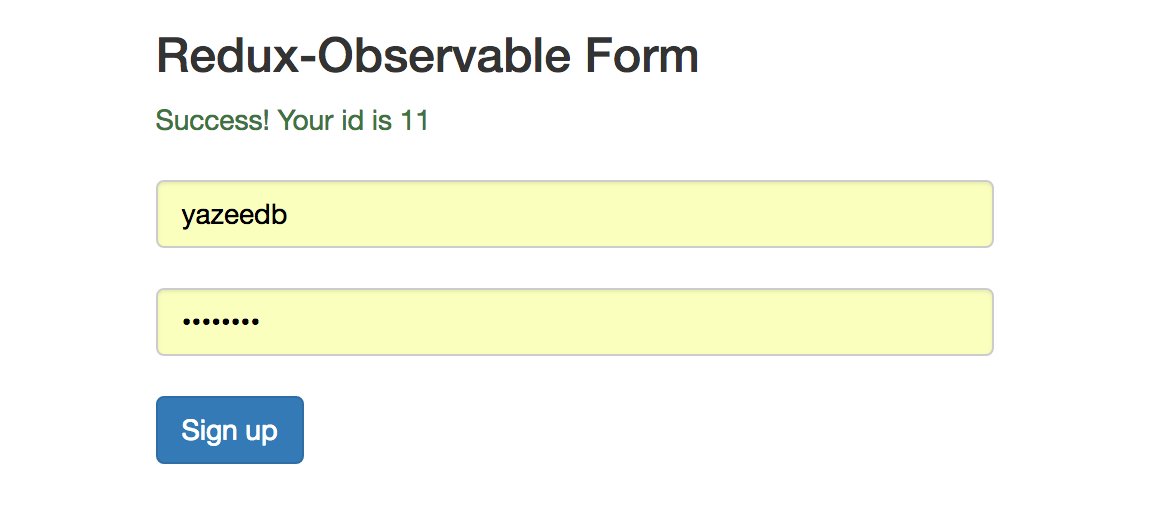
A little success message
Is it really success if no one tells you about it?
Let’s add a little message in our component’s JSX.
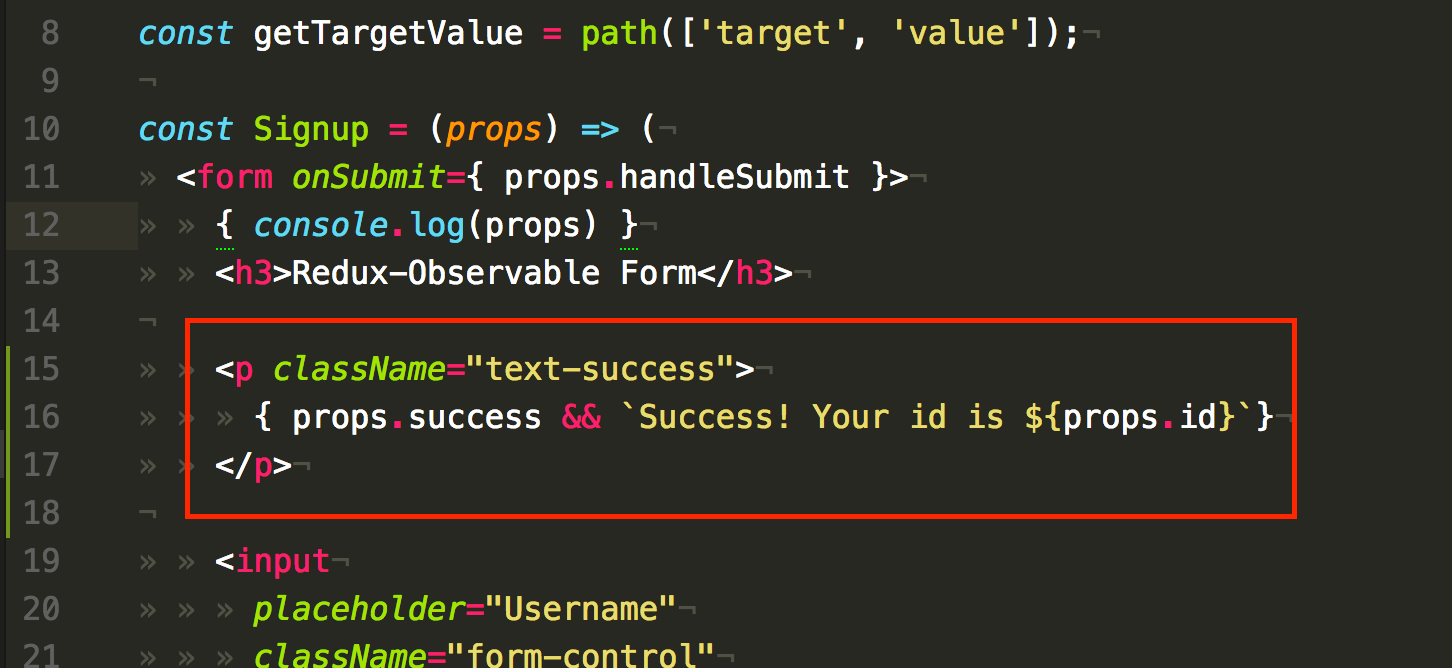
And on success, our result is
Now what?
I’d say this app’s built to scale.
The UI and state logic are made of pure, easily tested functions.
Our side effect’s contained within Redux-Observable, and future side effects will follow suit.
We can take this app anywhere we want, but we’ve reached the end of this blog post. Haven’t checked, but this might’ve been my longest post to date.
It was fun, hope to share more. Until next time!